Alex Apostoli (a.k.a Yaapu) has an excellent open source FrSky Telemetry LUA Script for the Horus X10, X12, Jumper T16 and Taranis X9D, X9E and QX7 but was primarily designed for ArduPilot. With the use of a Teensy 3.x board loaded with Eric Stockenstrom’s (a.k.a. zs6buj) Mavlink to FrSky passthrough protocol telemetry, PX4 can now use and take advantage of the script and use just about all the FrSky sensors. This video shows my Jumper T16 setup with the still under development map interface. When it’s ready for release, I’ll add the steps here.
I’m not a coder and consider myself a noob and a novice and as such, had a fairly steep learning curve to implement. The intention here is to provide an almost step-by-step process to install and use it. The other objective is to hopefully make this a one-stop-shop resource that pulls all the info from the different sites from start to finish in one place.
Some basic soldering is required. You can read more in RCGroups and ArudPilot forums.
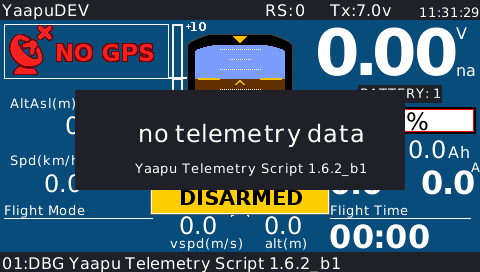
After everything is done, you’ll have telemetry presentations in your transmitters as below. Enjoy and Good Luck!
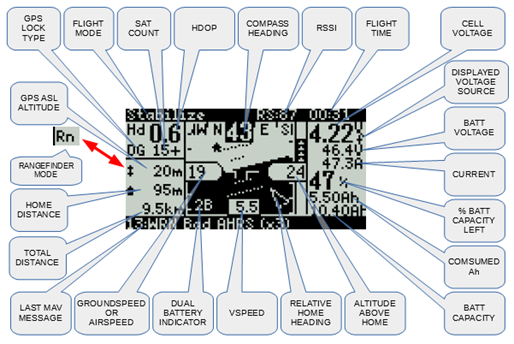
Taranis Q X7
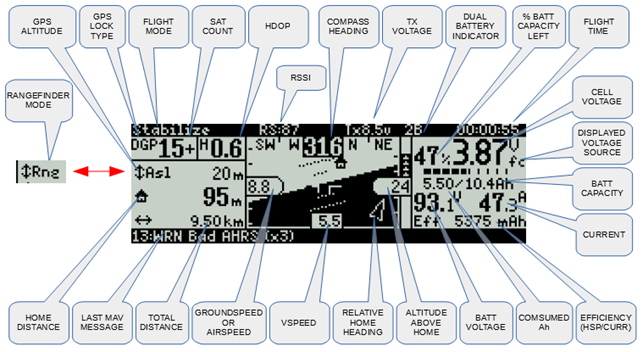
Taranis X9D and X9E
Horus X10 and X12 ; Jumper T16
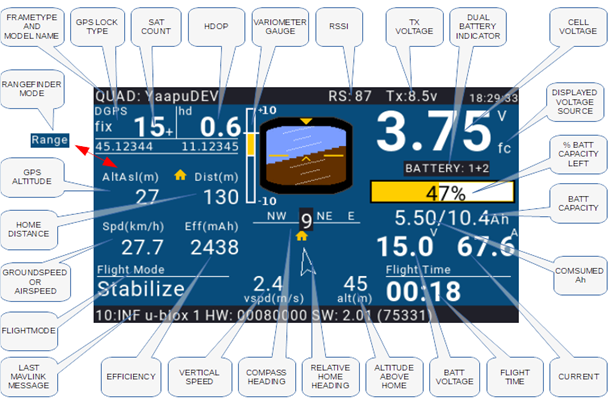
Current Default Display
Software needed for Windows:
- Arduino IDE v1.8.8 (or if you already have 1.8.7, 1.8.6, 1.8.5, 1.8.1, 1.6.5-r5 or 1.0.6)
- Teensyduino v 1.46
- Teensy Loader
- MavlinkToPassthru
- FrSky Telemetry Master Script or FrSky Telemetry Latest Releases
Hardware needed:
- Teensy 3.2 board available from eBay or Amazon
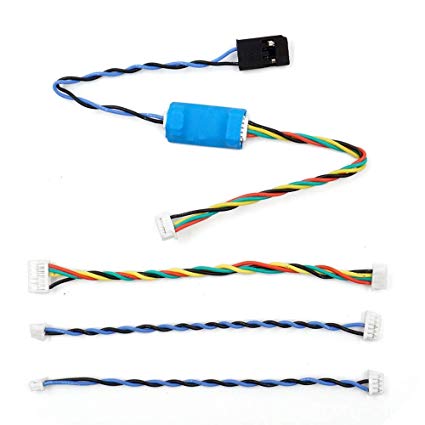
- Pixhawk 3-pin wire harness (Safety switch)
- Pixhawk 6-pin wire harness (Telem port)
Preparation:
-
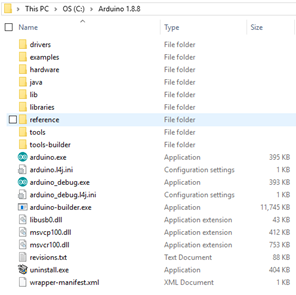
Download and install Arduino IDE in C:. It’s not required but I like to add the version number of what I’m installing for reference later on with other projects.
-
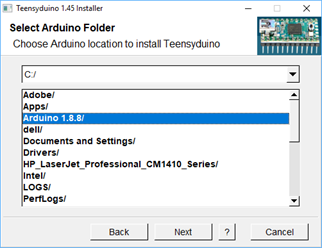
Download and install Teensyduino.
- Follow the installation instructions from the download page.
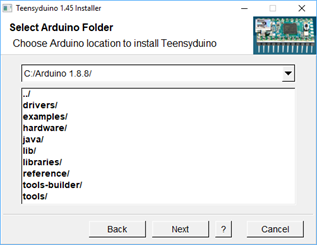
- In the Select Arduino Folder , click the pull down menu and choose your Arduino installation location.
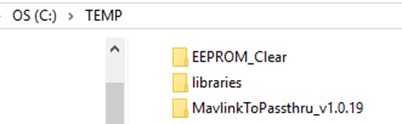
If you don’t have it yet, create a TEMP folder in C:\ (C:\TEMP).
-
Download Teensy Loader and save it in C:\TEMP.
-
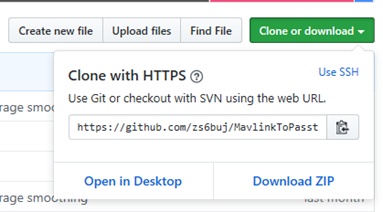
Download the MavlinkToPassthru zip file and unzip or choose Open in Desktop if you have GitHub Desktop.
-
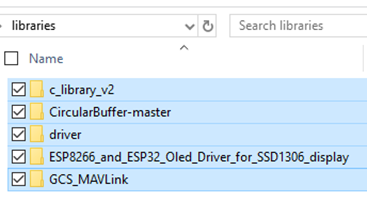
After unzipping or cloning, copy all the folders in the \MavlinkToPassthru-master\libraries\ to C: Arduino\libraries\ folder.
-
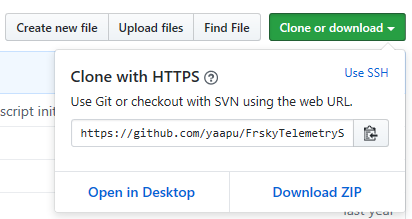
Download FrskyTelemetryScript zip file and unzip or choose Open in Desktop if you have GitHub Desktop.
- After unzipping or cloning, copy the folder MavlinkToPassthru_v1.0.16 to C:\TEMP
Install MavlinkToPassthru
- After unzipping or cloning, copy the folder MavlinkToPassthru_v1.0.16 to C:\TEMP
-
Open Arduino IDE
-
Click File>Preferences>Browse to C:\TEMP then click Open the click OK
-
Click File>Open and drill down to C:\TEMP\MavlinkToPassthru_v1.0.19\
-
Double-click on MavlinkToPassthru_v1.0.19.ino
-
Go to Tools>Board> then click on Teensy 3.2 /3.1
-
Go to Tools>USB Type> then click on Keyboard + Mouse + Joystick
-
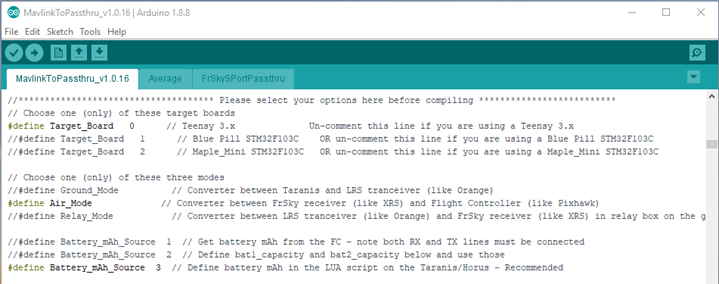
Scroll down and make sure that Air Mode is defined (there’s no “//” before it.
- If there is, simply delete the “//” and put the slashes in front of the one that had it, i.e. if #define Relay Mode didn’t have it, put the two slashes in front of it //#define Relay Mode.
- Then click the check mark icon on the top left corner to Verify or go to Sketch>Verify/Compile
-
When there are no errors, you should get a message similar to this on the bottom
-
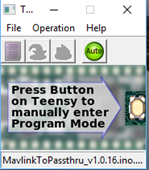
It will also open Teensy Loader
-
You can do one of these to upload the firmware:
- Press the Arrow icon on the top right corner

- Go to Sketch then click Upload
- Press the button on the Teensy as indicated by the Teensy Loader
- Press the Arrow icon on the top right corner

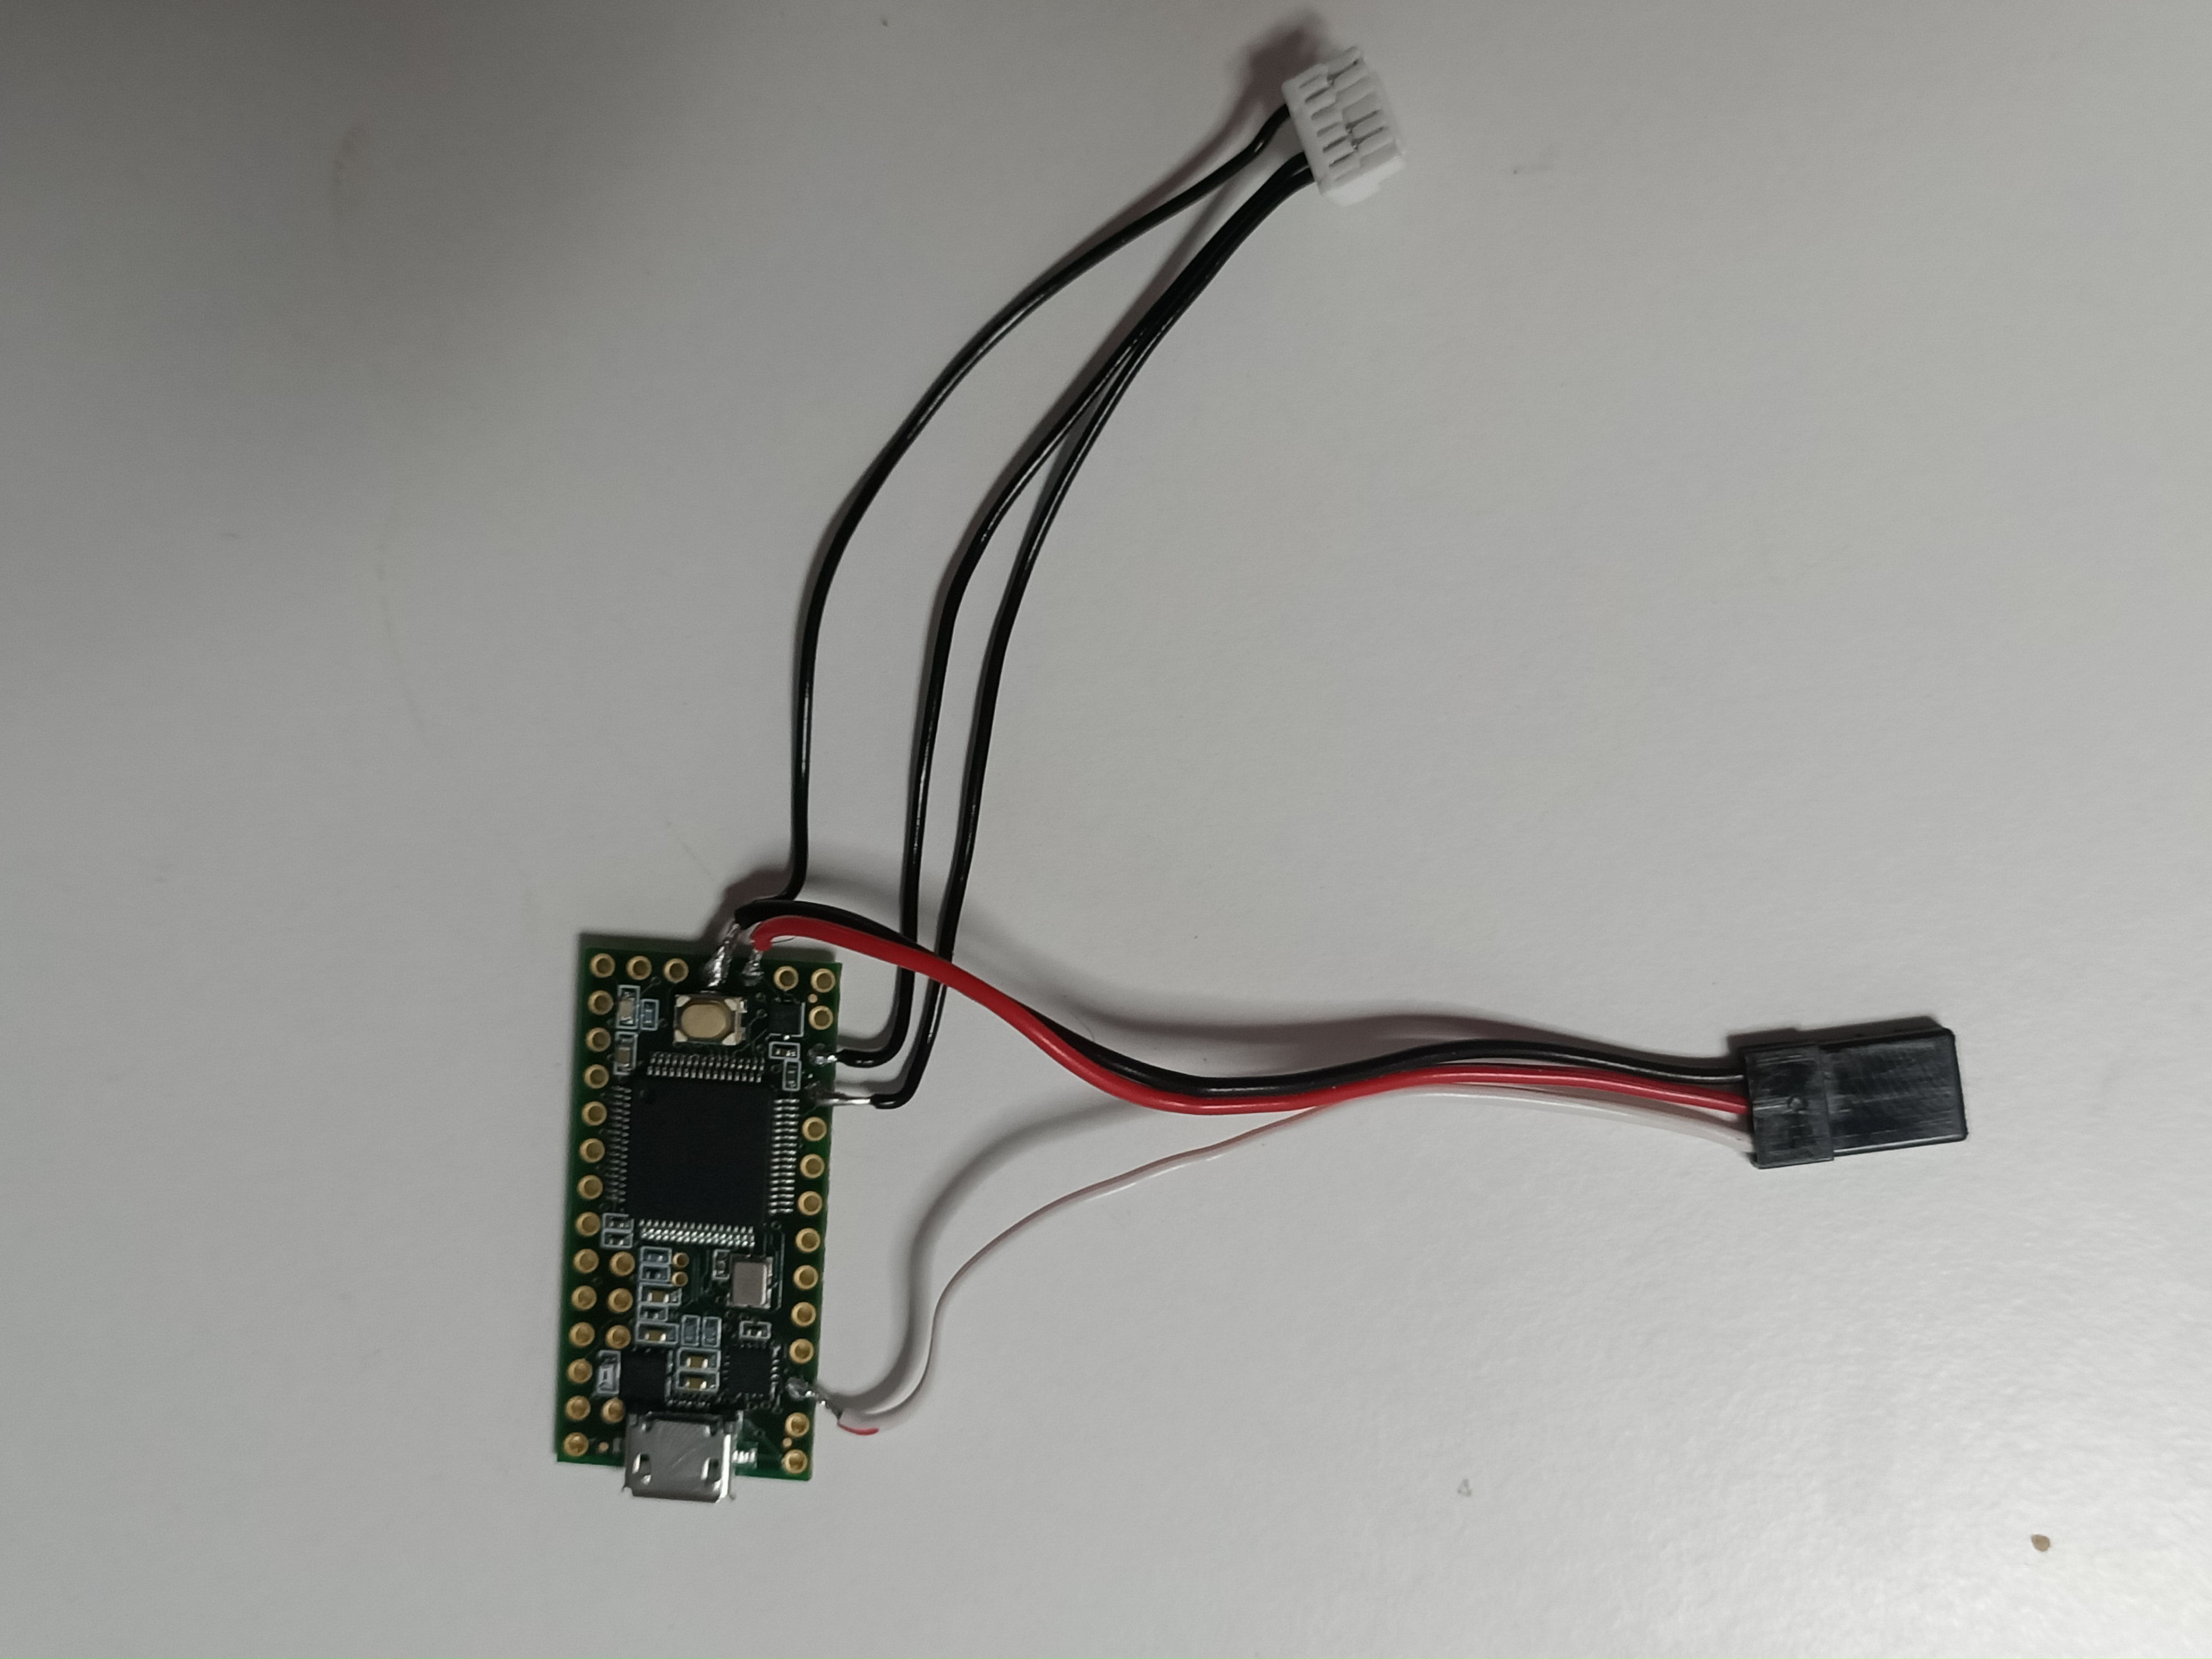
Wiring to Teensy board
See the diagram on how to solder the Pixhawk wiring to the Teensy except plug it in TELEM2

Here’s my bench test bed setup
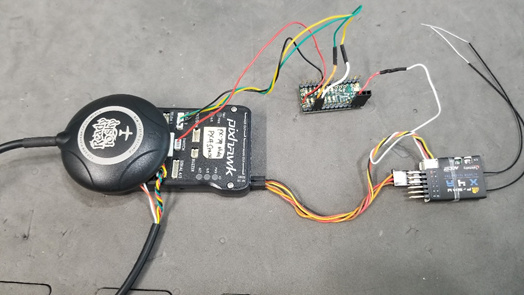
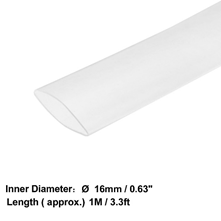
When you’re satisfied with the connection after testing, you can use a 16mm diameter clear heat shrink to protect it.
Configuring and setup in QGroundControl
PX4 v1.8.2 and earlier
In the parameters tab, set SYS_COMPANION = FrSky Telemetry.
PX4 v1.9.0 and later
- In the parameters tab, set the following:
- MAV_0_CONFIG = TELEM 2
- SER_TEL2_BAUD = 57600 8N 1
- SYS_COMPANION = Disabled
- TEL_FRSKY_CONFIG = Disabled
Installing and running LUA script on Taranis Q X7 and X9D
These instructions are from Github.
-
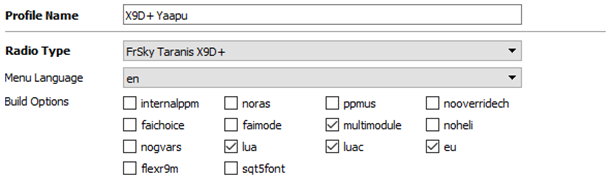
Make sure your radio has at least OpenTX 2.2.3 or the latest release.
-
Enable both lua and luac support by checking the relevant options prior to flashing your radio with Companion
-
Go to where you downloaded the FrSky Telemetry Script unzipped it.
-
Copy the contents of “yourfolder”\FrskyTelemetryScript\TARANIS\SD\SCRIPTS\TELEMETRY to your radio SD card’s \SCRIPTS folder.
-
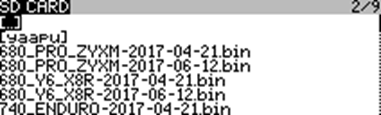
Copy and paste the “yaapu” folder of “yourfolder”\FrskyTelemetryScript\TARANIS\SD \MODELS\ to your radio SD card’s \MODELS folder.
-
Copy and paste the “yaapu0” folder of “yourfolder”\FrskyTelemetryScript\TARANIS\SD \SOUNDS\ to your radio SD card’s \SOUNDS folder.

-
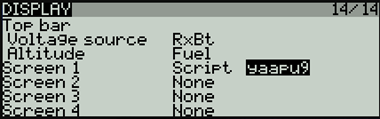
On your Tx, press Menu then press Page until you get to the DISPLAY page.
-
On Screen1, select Script then select yaapu7 for Q X7 or yaapu9 for X9D.
Which files to use -
For X9D/X9D+ and X9E radios use the yaapu9 script
-
For QX7 radios use the yaapu7 script
-
For X-Lite radios use the yaapu7
The script is already compiled and only needs to be copied to your radio SD card.
X9 series folder structure
- /MODELS/yaapu/modelname.cfg
- /MODELS/yaapu/modelname_sensors.lua (optional)
- /SCRIPTS/TELEMETRY/yaapu9.lua
- /SCRIPTS/TELEMETRY/yaapu9.luac
- /SCRIPTS/TELEMETRY/yaapu/alt9_view.luac
- /SCRIPTS/TELEMETRY/yaapu/draw9.luac
- /SCRIPTS/TELEMETRY/yaapu/hud9.luac
- /SCRIPTS/TELEMETRY/yaapu/left9.luac
- /SCRIPTS/TELEMETRY/yaapu/left9_m2f.luac
- /SCRIPTS/TELEMETRY/yaapu/menu9.luac
- /SCRIPTS/TELEMETRY/yaapu/right9.luac
- /SCRIPTS/TELEMETRY/yaapu/copter.luac
- /SCRIPTS/TELEMETRY/yaapu/copter_px4.luac
- /SCRIPTS/TELEMETRY/yaapu/plane.luac
- /SCRIPTS/TELEMETRY/yaapu/plane_px4.luac
- /SCRIPTS/TELEMETRY/yaapu/rover.luac
- /SOUNDS/yaapu0/en
- /SOUNDS/yaapu0/it
- /SOUNDS/yaapu0/fr
- /SOUNDS/yaapu0/de
QX7 and X-Lite folder structure
- /MODELS/yaapu/modelname.cfg
- /MODELS/yaapu/modelname_sensors.lua (optional)
- /SCRIPTS/TELEMETRY/yaapu7.lua
- /SCRIPTS/TELEMETRY/yaapu7.luac
- /SCRIPTS/TELEMETRY/yaapu/alt7_view.luac
- /SCRIPTS/TELEMETRY/yaapu/draw7.luac
- /SCRIPTS/TELEMETRY/yaapu/hud7.luac
- /SCRIPTS/TELEMETRY/yaapu/left7.luac
- /SCRIPTS/TELEMETRY/yaapu/left7_m2f.luac
- /SCRIPTS/TELEMETRY/yaapu/menu7.luac
- /SCRIPTS/TELEMETRY/yaapu/right7.luac
- /SCRIPTS/TELEMETRY/yaapu/copter.luac
- /SCRIPTS/TELEMETRY/yaapu/copter_px4.luac
- /SCRIPTS/TELEMETRY/yaapu/plane.luac
- /SCRIPTS/TELEMETRY/yaapu/plane_px4.luac
- /SCRIPTS/TELEMETRY/yaapu/rover.luac
- /SOUNDS/yaapu0/en
- /SOUNDS/yaapu0/it
- /SOUNDS/yaapu0/fr
- /SOUNDS/yaapu0/de
Configure LUA to work with PX4
- Turn on the Tx
- Long press Page to go to the HUD screen
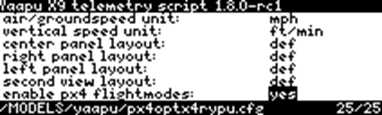
- Long press Menu then scroll down to “enable px4 flightmodes:” then press ENT to change it to “yes”.
- You can also change the units for “air/groundspeed unit” and “vertical speed unit” if you don’t want the Defaults.
- Press Exit to come to the HUD screen.
- Powercycle (turn Tx Off then back On).
- Long press Page.
- Power On the Pixhawk and if everything is working properly, your HUD will start displaying telemetry data from your flight controller. Pitch, roll and yaw the flight controller/ aircraft to test the screen.
Installing and running LUA script on Jumper T16 and Horus X10/ X12
These instructions are from Github.
- Copy the contents of the SD folder to your radio SD Card.
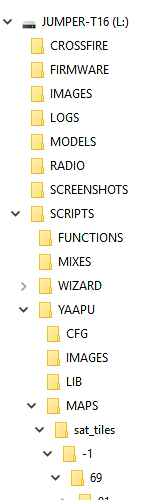
- Make sure you have the following folders:
- /SOUNDS/yaapu0
- /SCRIPTS/YAAPU/CFG
- /SCRIPTS/YAAPU/LIB
- /SCRIPTS/YAAPU/IMAGES
- /WIDGETS/Yaapu folders.
- Power cycle the radio to clear widget caches!
Note: For the script to control the LCD panel backlight, a few extra steps are required, please follow this guide
The script is already compiled and only needs to be copied to the radio SD card.
The correct folder structure is
- /SCRIPTS/YAAPU/CFG
- /SCRIPTS/YAAPU/IMAGES
- /SCRIPTS/YAAPU/yaapux.lua
- /SCRIPTS/YAAPU/yaapux.luac
- /SCRIPTS/YAAPU/menu.lua
- /SCRIPTS/YAAPU/menu.luac
- /SCRIPTS/YAAPU/LIB/copter.lua
- /SCRIPTS/YAAPU/LIB/copter.luac
- /SCRIPTS/YAAPU/LIB/plane.lua
- /SCRIPTS/YAAPU/LIB/plane.luac * /SCRIPTS/YAAPU/LIB/rover.lua
- /SCRIPTS/YAAPU/LIB/rover.luac
- /SCRIPTS/YAAPU/LIB/init.lua
- /SCRIPTS/YAAPU/LIB/init.luac
- /SOUNDS/yaapu0/en
- /SOUNDS/yaapu0/it
- /SOUNDS/yaapu0/fr
- /SOUNDS/yaapu0/de
- /WIDGETS/Yaapu/main.lua
- /WIDGETS/Yaapu/main.luac
Note: On radios without the luac option enabled it is necessary to use the .lua versions
Configure Jumper T16 and Horus X10/ X12
You need to configure up to four full screen telemetry pages.
Each page will have the Yaapu Widget configured to show different information.
To toggle between pages short press the [PAGE] button.
The Widget is configured by changing the page option in the “Widget settings”.
Widget valid page options are
- Main screen for single or aggregate view (mandatory)
- Mavlink message history screen (mandatory)
- Min/Max screen for single or aggregate view (optional)
- Main screen for dual battery view (optional)
Note: after the files have been copied to the SD card the radio needs to be rebooted to clear all widget caches
Index
Mandatory steps
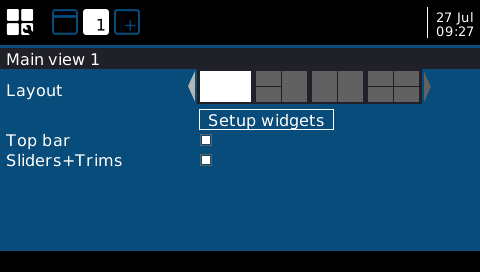
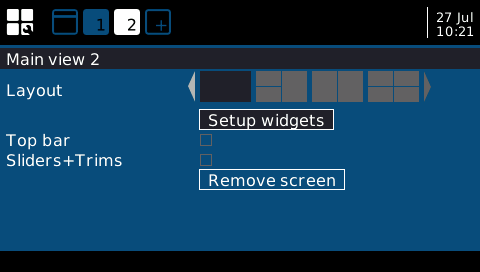
- Long press [TELE] to enter telemetry page setup
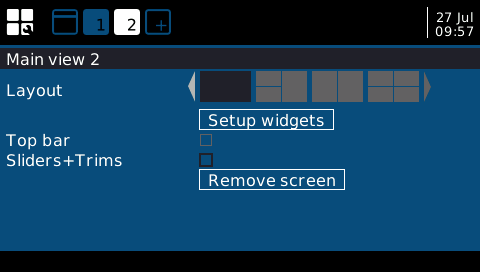
- Short press Scroll Wheel and use it to change the “Layout” to full screen, confirm pressing it and press [RTN] to exit from the “Layout” setup
- Uncheck “Top Bar” and “Sliders+Trims”
- Select “Setup widgets” and press Scroll Wheel, you’ll be presented with a full empty screen layout.
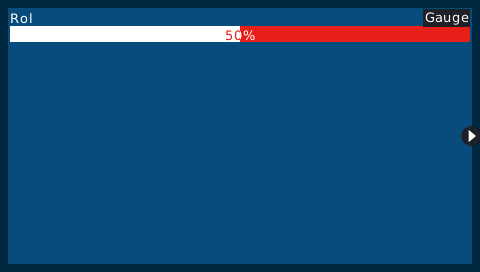
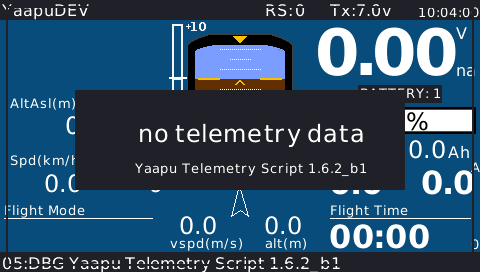
- Short press Scroll Wheel to assign a widget to the layout. The first available widget will be shown, “Gauge” in this example
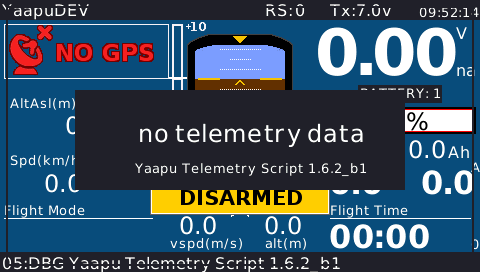
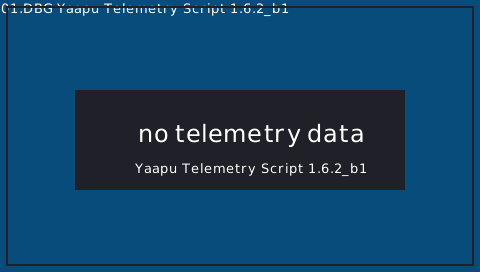
- Scroll until you see the Yaapu script main display
- press Scroll Wheel to confirm the widget selection
- Press [RTN] to return to the telemetry pages setup
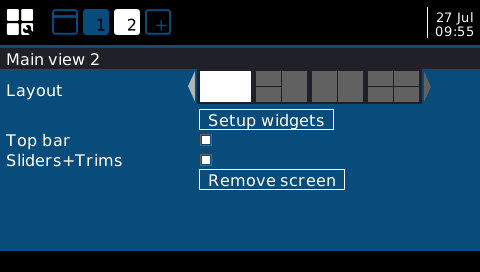
- Add a new telemetry page by pressing [PAGE] to select the plus [+] icon
- Press the Scroll Wheel to create a new page. The Yaapu widget instance of this page will hold the Mavlink message history
- Uncheck “Top Bar” and “Sliders+Trims”
- Select “Setup widgets” and press the Scroll Wheel. You’ll be presented with a full screen empty widget layout
- Short press the Scroll Wheel to assign a widget to the layout, the first available widget will be shown, “Gauge” in this example
- Scroll the Scroll Wheel until you see the Yaapu script main display
- Confirm the selection pressing the Scroll Wheel
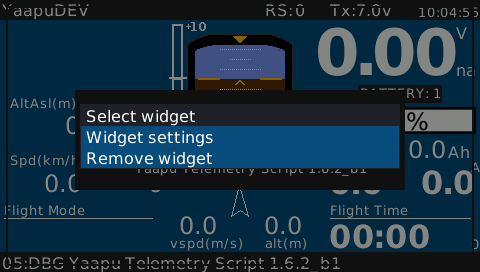
- Long press the Scroll Wheel to enter the widget menu
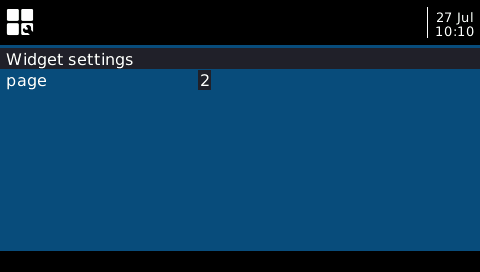
- Select “Widget settings” to enter the Yaapu widget options menu
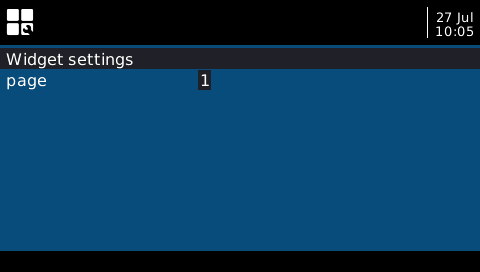
- Press the Scroll Wheel (1 will start blinking) and change the “page” option to 2
- Press [RTN] to display the Mavlink message history screen
- press [RTN] to return to the main telemetry setup page
Turn your radio OFF and ON, the Yaapu widget should start at Power On!


Optional steps
To display the min/max screen repeat the steps from 9 to 20, you have to add an extra Yaapu full screen widget and set the script “page” option to 3 (step 18)
To display dual battery screen repeat the steps from 9 to 20, you have to add an extra Yaapu full screen widget and set the script “page” option to 4 (step 18)
Turn your radio OFF and ON, the Yaapu widget should start at Power On!
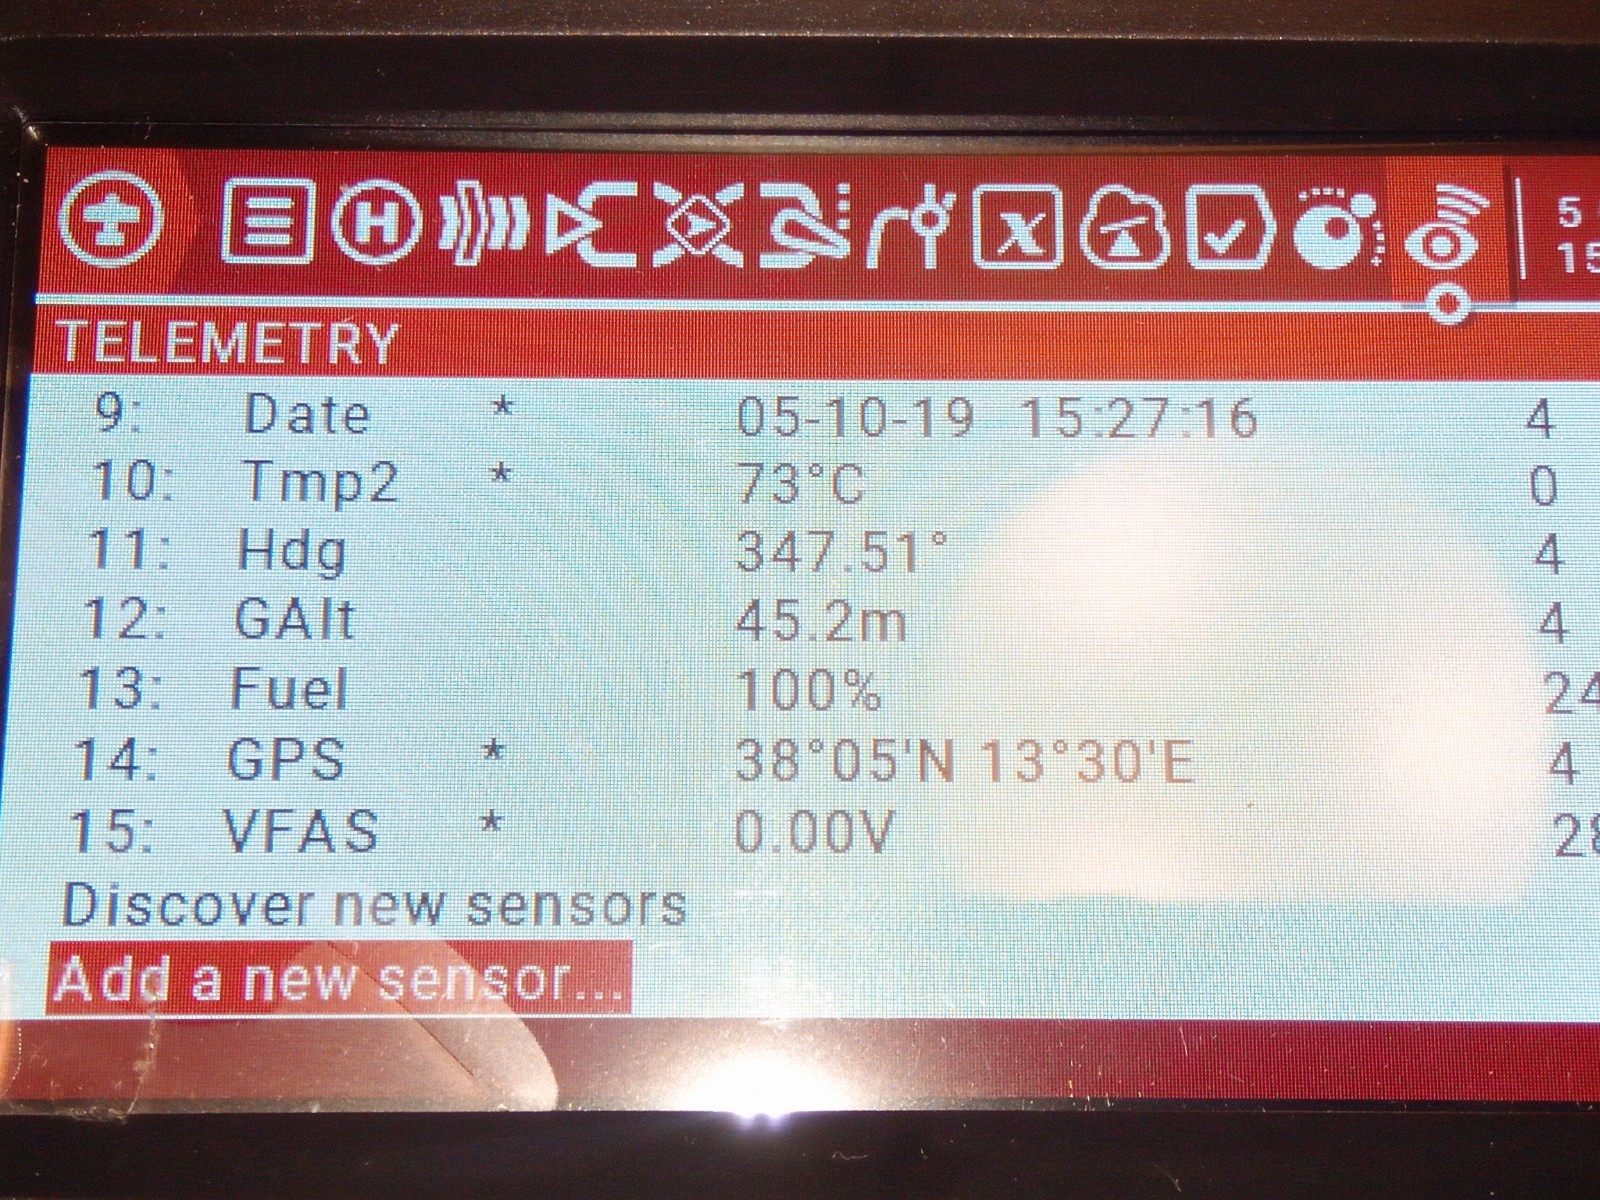
Sensor discovery
Power up the flight controller.
Now from the Yaapu widget page long press [MDL]

Press [PAGE] and select the TELEMETRY page
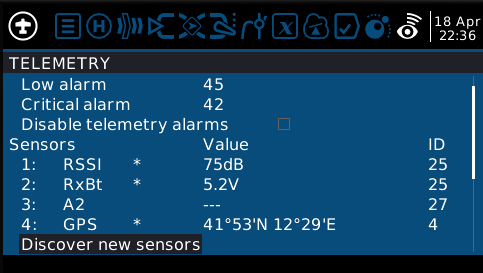
Run “Discover new sensors”, press [RTN] twice to go back to the Yaapu widget while discovery is running (do not stop sensor discovery)
As a last step from the Yaapu widget page long press [MDL]
Use the Scroll Wheel to select the telemetry page:
All sensors should have been discovered
Stop discovery and press [RTN] twice to go back to the Yaapu widget
Note: in order for discovery to work the telemetry link has to be active!
How to access the script configuration MENU while in Widget mode
From any of the telemetry pages, (the Yaapu main widget page in this example)
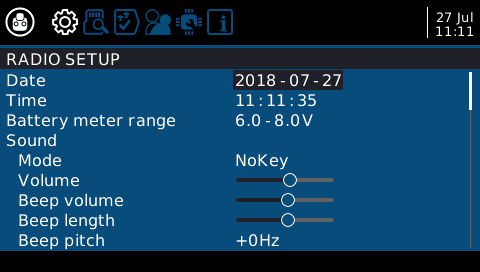
Long press [SYS] to enter the Radio Setup
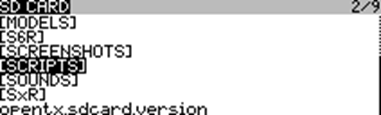
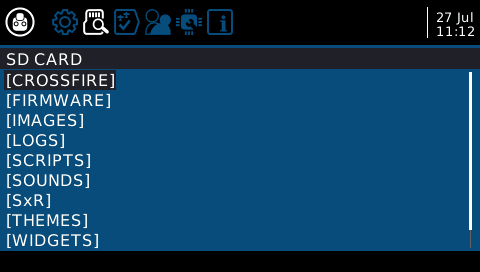
Press [PAGE] to select the “SD CARD” tab
Browse to the /SCRIPTS/YAAPU folder
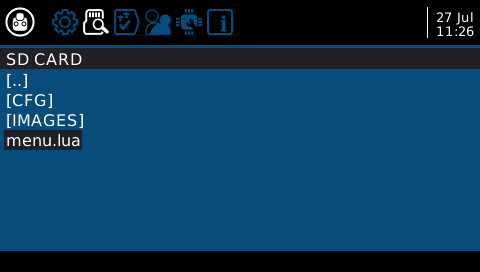
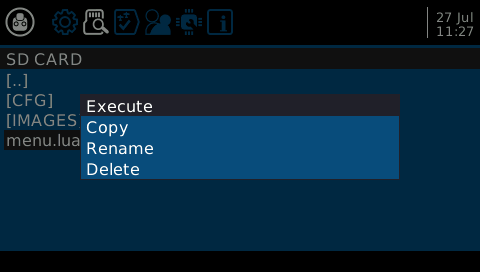
And Execute the “menu.lua” or “menu.luac” file by pressing the Scroll Wheel
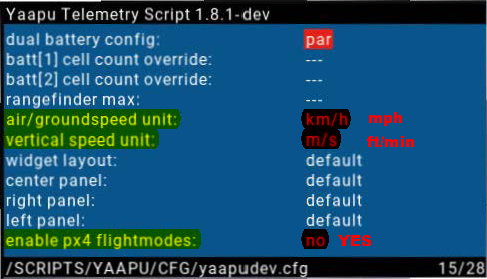
This will show the Yaapu script configuration menu. Scroll down to “enable px4 flightmodes:” Press the Scroll Wheel and change it to “yes”. You can also change the units for “air/groundspeed unit” and “vertical speed unit” if you don’t want the Defaults. All changes are automatically saved.
Exit from the menu script by long pressing [RTN], then short press [RTN] twice to return to the main model telemetry page
Note: to apply the changes to the running widget you have to change the widget active page at least once by short pressing [PAGE], for instance toggle from the main screen to the message history screen
Notes
Extra telemetry pages can be added to show whatever widget the user wants to, the Yaapu widget will be running in the background and all telemetry related events will be vocally reported. This allows to leverage the full OpenTX flexibility while the Yaapu script is running.
While the “menu.lua” configuration menu is running all the widgets are stopped (execution is frozen) and all telemetry info received while in the configuration menu is lost, this is an OpenTX limit, i.e. while a one time script is running, all other LUA script are stopped. The user has to keep this in mind when launching the configuration menu while flying! While in the menu the flight timer is not stopped or reset and once back to the telemetry page it will report the correct flight time.
How to configure the Mapping Widget
Alessandro Apostoli edited this page 3 hours ago · 3 revisions
Video “How to configure” by Built from Home.
Introduction to the Mapping Widget
The following procedure explains how to download the required “offline” map tiles used by the Yaapu Mapping feature.
For each flying site the pilot will have to download the mapping tiles required to “cover” the area that the widget will display.
Up to 3 zoom levels are supported (max is -2)
A typical setup would use zoom levels -2, -1, 0 .
To switch between levels a radio channel must be assigned to the zoom toggle function from the Yaapu configuration menu.
The basic steps are:
- Download tiles for the area at the required zoom level
- Process the tiles with mktiles.cmd
- Copy the tiles to the radio SD card
There are no limits to the number of sites and/or tiles that the widget can handle. The only limit is the size of the SD card.
Note: The provided mktiles.cmd script is for windows users only.
Required software
You’ll need:
- gmapcacther to download the tiles
- imagemagick to process the tiles
- maps folder template with example layout and mktiles.cmd script
Detailed configuration steps
- Run gmapcacther
- Search your flying site location.
Assuming you’ll use zoom levels -2,-1 and 0, do all the searching at zoom level 1, this will not download tiles for higher zoom levels (0,-1,-2) that you’ll use for the widget.
If you’d like to use lower zoom levels simply do the searching at 1 level lower than the one you’ll use to fly.
- Right click and select “batch download”
- Define min zoom -2 and max zoom 0 and start downloading
Note The GMapCatcher User Wiki shows how to set a path and then download the area that would be included in a visual path. Shown below is an example 100km path. (thanks to Greg Covey for the example)
When you Shift+drag the map, then the area included in the visual download zone is queued for download, from the zoom level below the current view zoom level, to the visual download’s minimum zoom level as set
One main function of the tool is to allow you to download close-up maps along a path; it gives feedback of the number of tiles downloaded/requested while downloading
- Go to the download folder " %UserProfile%/.GMapCatcher/sat_tiles/*" and copy zoom level folders 0,-1 and -2 to a temporary folder you’ll use to resize the downloaded tiles. Let’s assume your temp folder is %UserProfile%/temp.
Now the downloaded tiles need to be resized to 100x100, the provided mktiles.cmd script uses imagemagick to do the resizing, it also processes the images to lower size and complexity.
- Copy mktiles.cmd to your temp folder %UserProfile%/temp
- Edit mktiles.cmd and set the correct path for imagemagick here
set MAGICK=“%ProgramFiles%\ImageMagick-7.0.8-Q16\magick.exe”
Change it to the path where imagemagick executable is installed
- CD\ to %UserProfile%/temp folder
- Execute the mktiles.cmd script, all tiles will be resized to 100x100
Warning: This step can require a substantial amount of time depending on the size of the selected area.
- Copy the resized tiles from %UserProfile%/temp to your SD card /SCRIPTS/YAAPU/MAPS/sat_tiles
folder structure should be something like:
- Power cycle the radio
Configuration
Note: The widget requires a valid OpenTX GPS sensor!
The final steps are:
- Define a screen toggle channel in the widget config menu, low is message history, mid is main screen, high is map view.
- Or assign page 5 to a widget screen the same way as 2 is used for message history, see here for more info.
Please make sure you have a valid GPS sensor in OpenTX telemetry page, if not please do a sensor discovery.
Note While using the mapping feature you’ll notice that GPS coordinates sent by ArduPilot may show a “ghost” zigzag pattern on the map whereas the real correct path would be a line or a curve. This unwanted behavior is due to sampling of latitude and longitude at different time (up to 1sec) and is a limit of the current passthrough library, more info here


