PX4 Paramotor Project update #2
I’m happy to share great progress in the PX4 Paramotor project! Here I present the results first!
Flights
First: Manual/Stabilized/Altitude mode flight
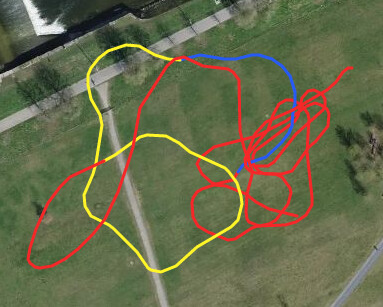
First-ever autonomous control was applied in Stabilized mode (in blue marking above), which demonstrated that roll attitude control works!
Then, altitude mode was tried out, which demonstrated autonomous control on both throttle and roll!
Log: Flight Review
Second: Loitering flight
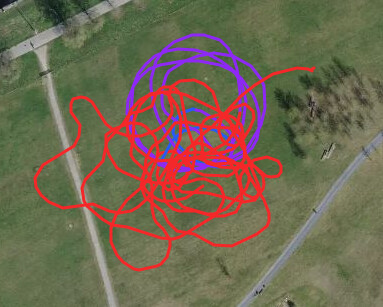
After getting confidence from the stabilized/altitude mode, I decided to try loiter mode, which beautifully demonstrated autonomously loitering (in circle) in constant altitude. It was such a triumph moment!
")
Log: Flight Review
Third: Autonomous mission & RTL flight
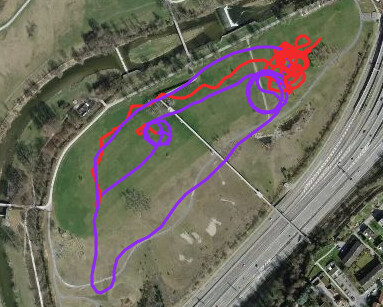
Now the final milestone of the day was tried: Mission mode. Which was kind of sketchy, but eventually it completed a 1.5km long waypoint mission successfully!
Then, a stretch goal of RTL (Return to home) was tried, which unfortunately wasn’t able to successfully finish due to the low battery level.
Log: Flight Review
Summary
Although quite restricted in pitch control / not tracking the position setpoints perfectly, this test demonstrated that a native Fixed Wing architecture in PX4 can be used directly to control a Paramotor fully autonomously.
There are of course lots of room for improvement, but this is indeed an amazing milestone and a great first step into getting paramotors as officially supported vehicle in PX4!
I would like to especially acknowledge Brett Fiedler, @sfuhrer, and @MaEtUgR for the help!
Breakdown of what happened on PX4 side
Now I will get nerdy and write about what I had to modify in the PX4 side for getting this to work!
PX4 Firmware
I used directly the build off of the main branch in PX4 with no custom modifications.
Paramotor control strategy with TECS & Roll control
To understand how I could possibly map all the controls appropriately, I had a call with Brett, who wrote his PhD in autonomous Paramotor control (also used PX4 & Simulink for dynamic Simulation).
Please find awesome work of Brett here: https://keep.lib.asu.edu/items/171662
The takeaway from the call was:
- Map the roll control to the brake lines in assymetric way
- Disable / limit the I-term control in Roll, as there’s a big delay in actuation vs response
- Map the TECS (Total Energy Control System) output (throttle, pitch) to the motor output
- Align the Center of Gravity with Motor thrust axis properly
So for that, I did the following:
Roll control setup
To only apply feed-forward control (brake input is just proportional to the roll-rate error):
- FW_RR_I: 0 (disable I-term)
- FW_RR_P: 0 (disable P-term)
- FW_RR_FF: 0.4 (enable feed forward)
Also, to have a small commanded roll setpoint to reduce the risk of the system going into a deep spiral (can happen with excessive rolling), I set:
- FW_R_LIM: 30 (limit maximum roll to 30 degrees in autonomous mode)
Pitch control setup
As it was evident from the call with Brett & from intuition, paramotor should not really control it’s pitch. Therefore, I disabled the pitch control completely:
- FW_PR_FF: 0
- FW_PR_I: 0
- FW_PR_P: 0
Note, since D terms are already by default 0, I don’t have to set them to 0 manually.
TECS setup
TECS is an essential control system that can control airspeed and altitude of a fixed wing vehicle using pitch & throttle control.
For that, I followed the TECS tuning guide:
- FW_AIRSPD_TRIM: 5.0 (Cruise speed when holding altitude)
- FW_AIRSPD_MIN: 4.0
- FW_AIRSPD_MAX: 6.0
- FW_AIRSPD_STALL: 3.0
- FW_THR_TRIM: 0.4 (Cruise throttle when holding altitude)
- FW_T_CLIMB_MAX: 2.0 (Rough maximum climb speed)
- FW_T_CLIMB_R_SP: 1.0 (Autonomous climb speed to use)
- FW_T_SINK_MAX: 2.0 (Rough maximum sink speed)
- FW_T_SINK_MIN: 1.3 (Minimum sink speed: when motor is off)
- FW_T_SINK_R_SP: 1.3 (Autonomous sink speed to use)
That’s a lot of parameters! But it is crucial to set them properly to make sure the TECS algorithm understands vehicle’s physical & desired capability correctly.
NPFG setup
NPFG, a.k.a “Non-linear Path Following Guidance” provides control for following a path (circle, line, etc). Although it isn’t documented well yet, I have set an important value to guarantee stability:
- NPFG_ROLL_TC: 1.0 (Roll time constant in seconds, roughly delay between actuation & achieving the desired roll angle)
To learn about the theory behind it, you can watch presentation of Thomas at PX4 Dev Summit 2022 & his PhD thesis!
Other setup
- FW_MAN_R_MAX: 30 (Maximum roll angle in manual control mode)
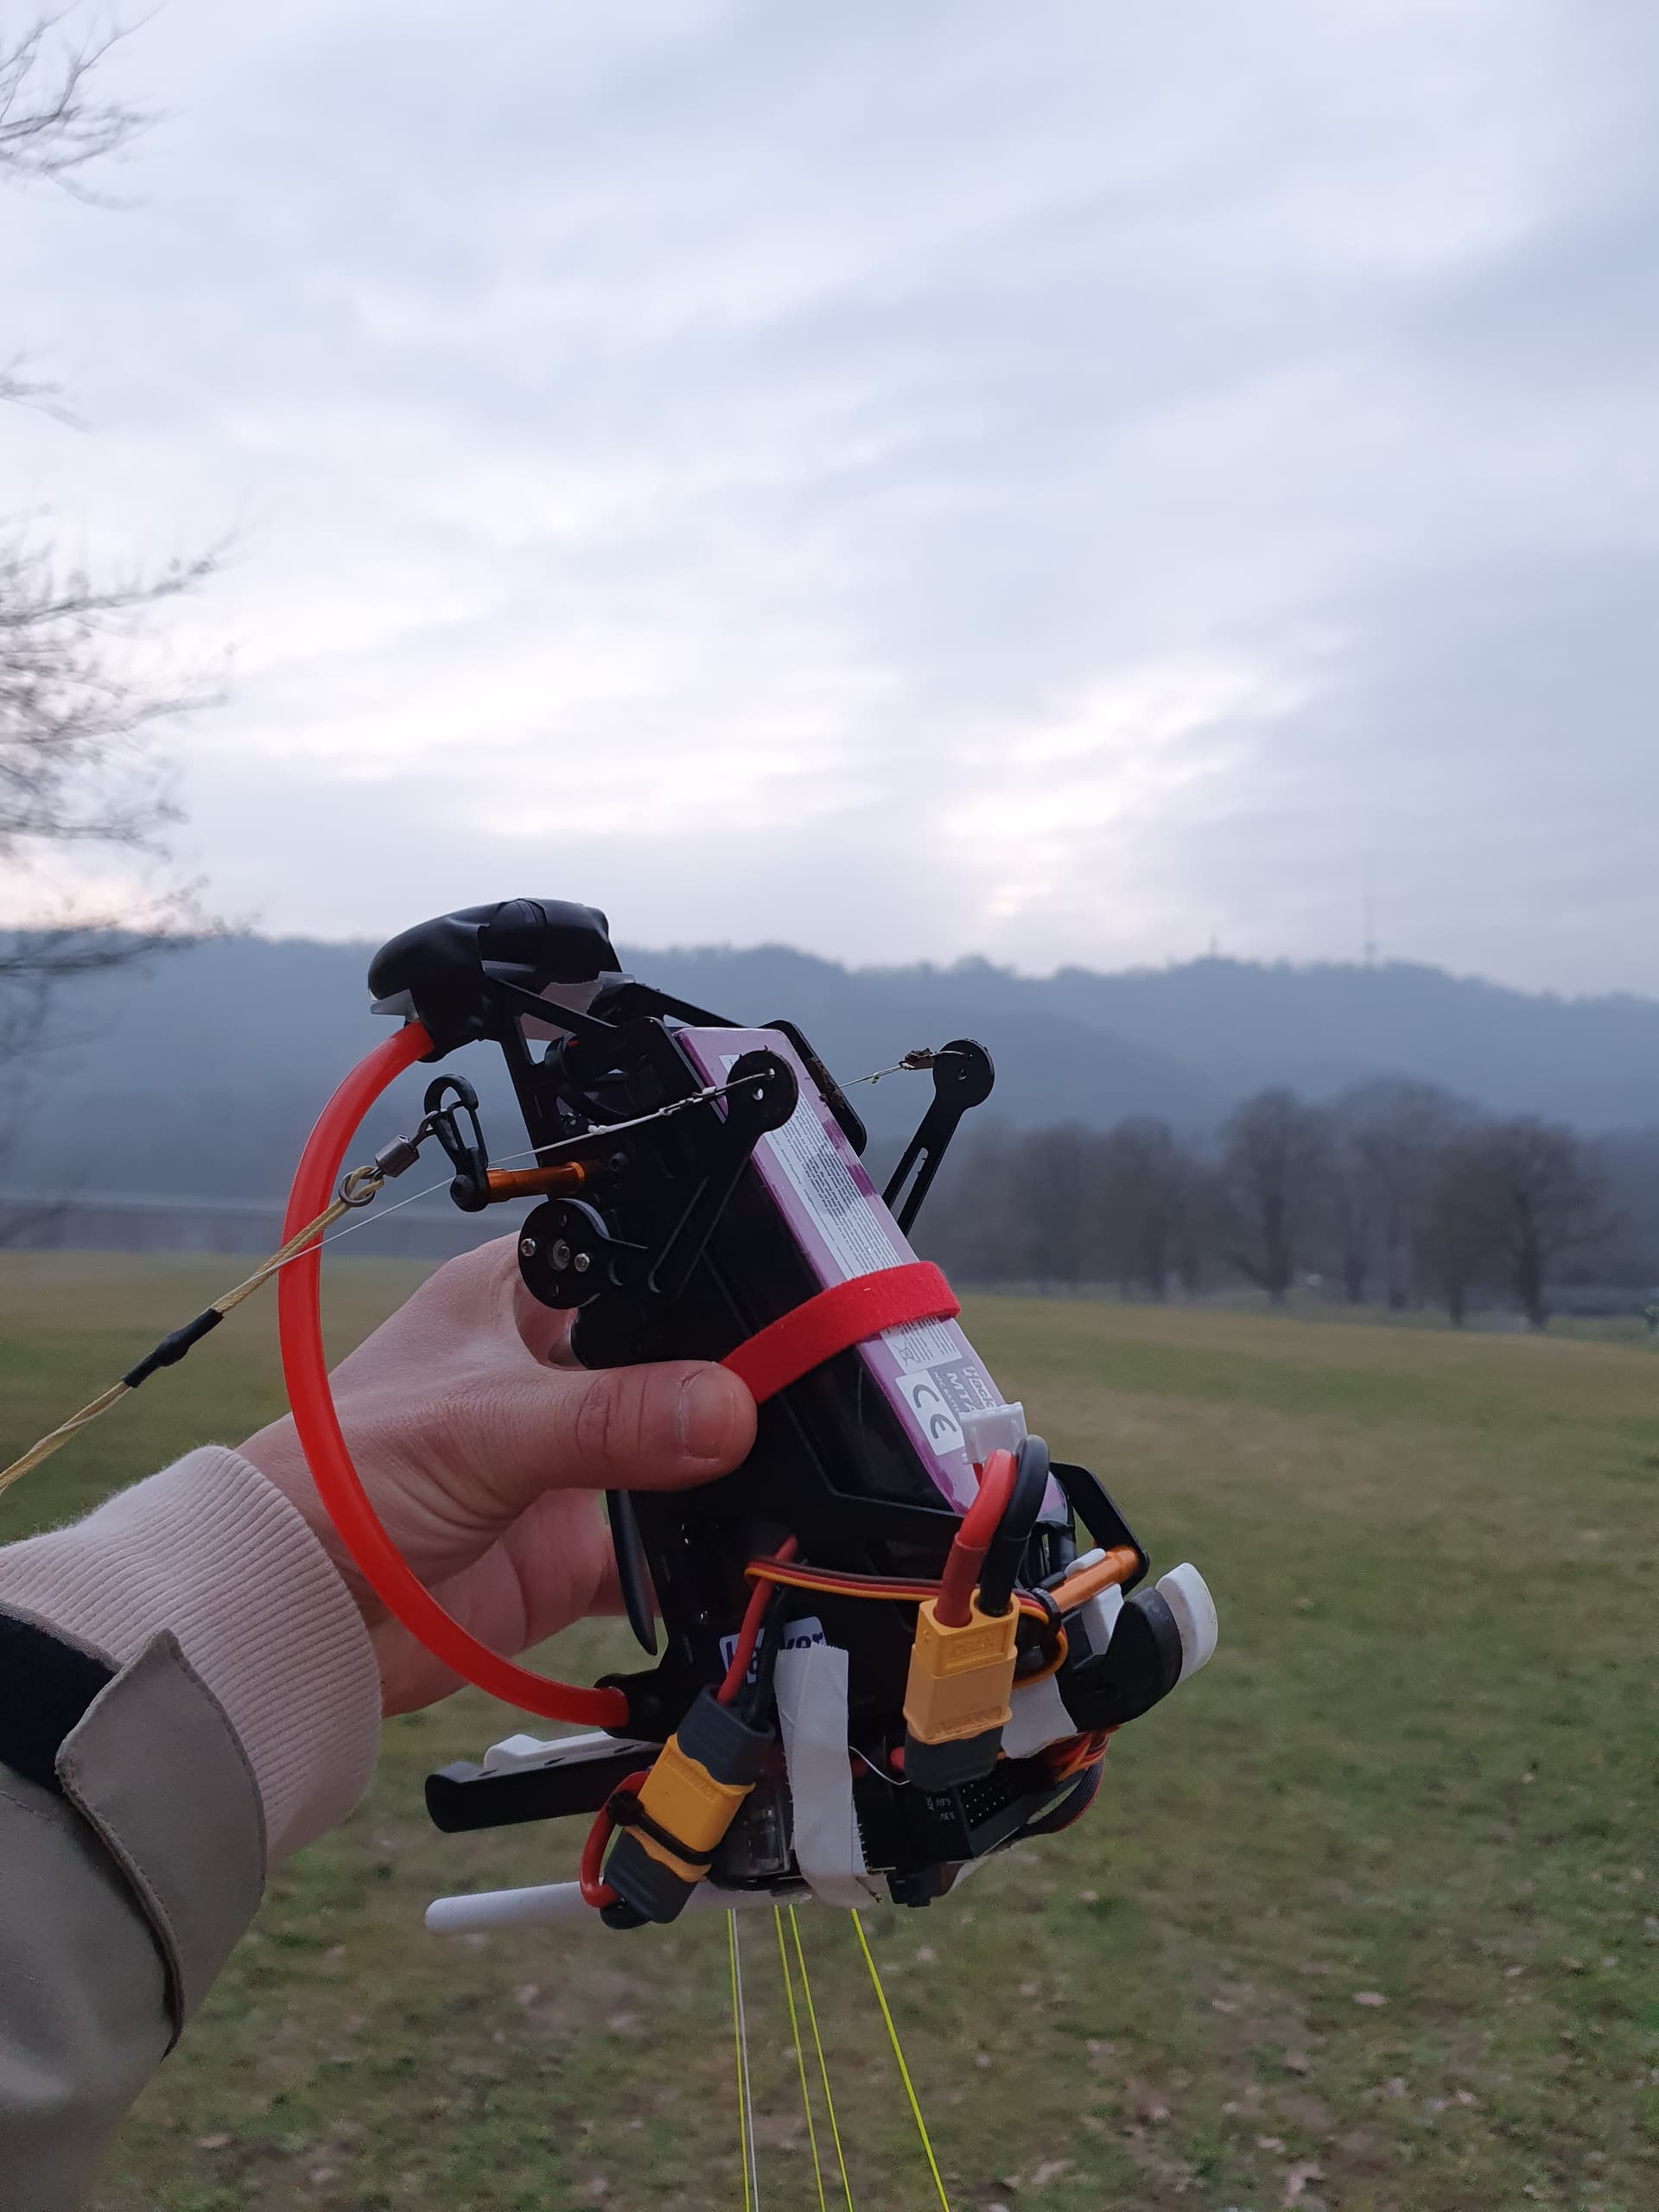
Breakdown of what happened on hardware side:
Not much has changed, but few things did:
- I shifted Autopilot’s position from back to the middle (vertically under the riser attach-point) to reduce angular velocity / acceleration resulting from distance with the Center of Gravity.
- I attached a WiFi Telemetry Radio, hoping to do some live tuning (but it didn’t work
 )
) - I removed GoPro to put the Center of Gravity higher (closer to riser attach-point) & reduce mass of the system.
Flight Review in detail
So let’s dive into some analysis for each of these flights!
First: Manual/Stabilized/Altitude mode flight
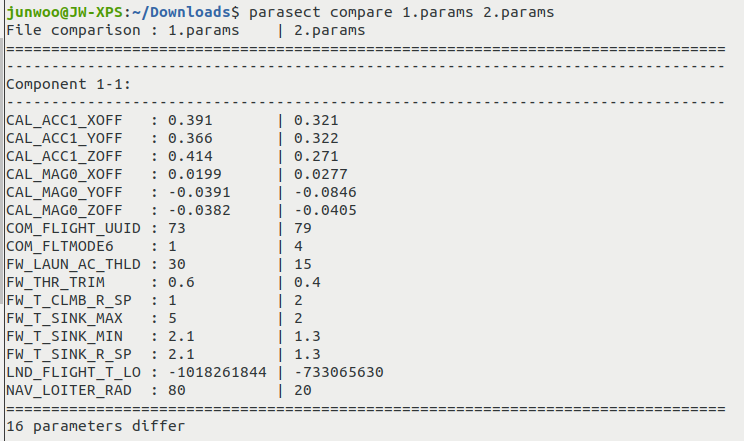
I used parasect to compare what changed in the parameters compared to the last flight:
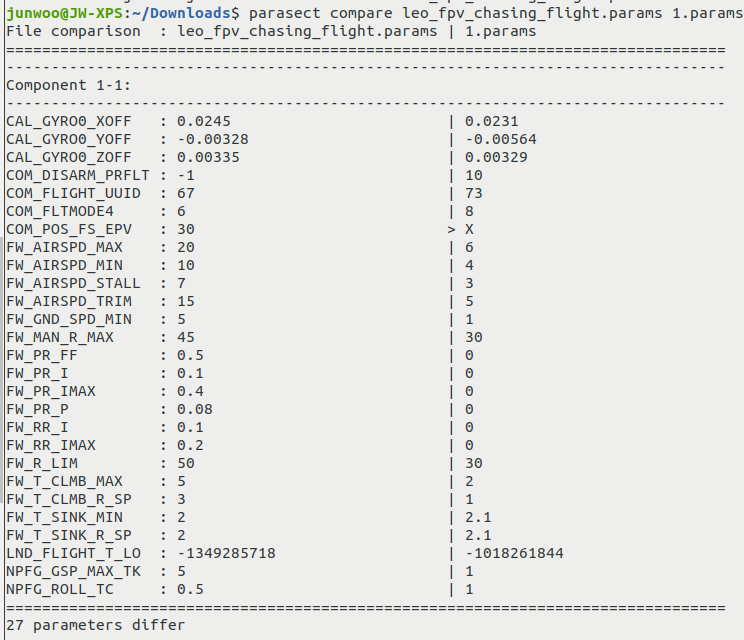
As you can tell, a lot of the parameters that I explained the reasoning behind above changed. However the CAL_GYRO0_* parameters were automatically changed by internal online calibration system of PX4, and not me!
Stabilized mode analysis
In Stabilized mode, the throttle command is directly passed through & roll command translates into roll angle setpoint.
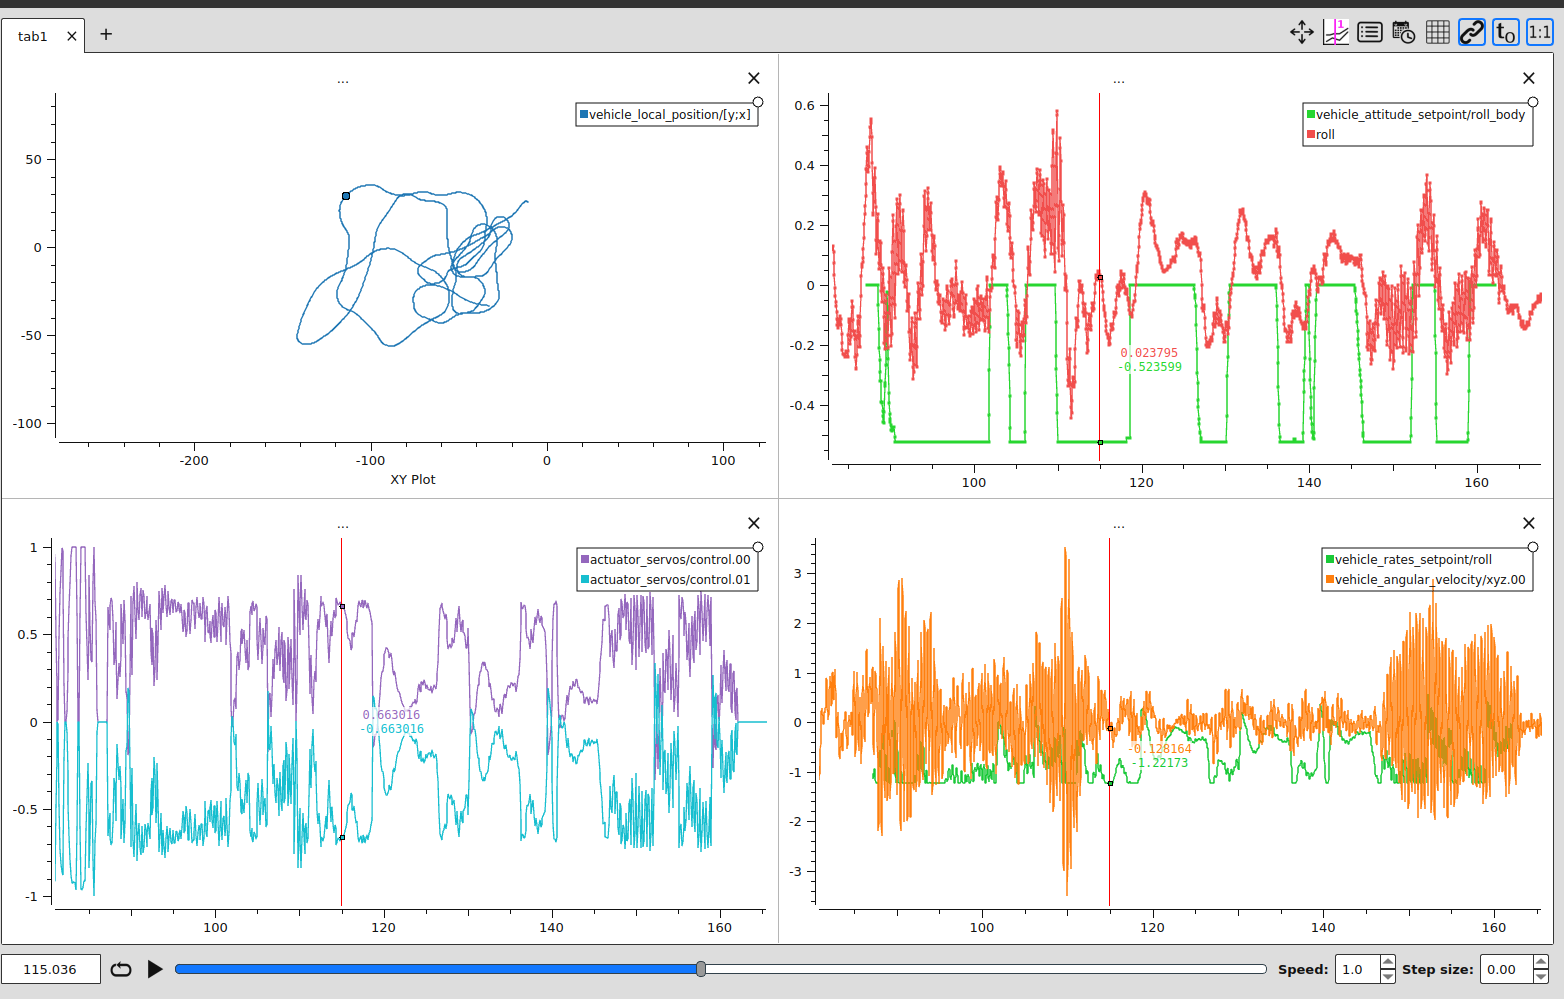
Here I plotted four things:
- 2D position, X:east, Y:north (upper left)
- Servo output (lower left)
- Roll angle setpoint vs actual roll angle (upper right)
- Roll rate setpoint vs actual roll rate (lower right)
In Stabilized mode, we really want to have the roll angle and roll rate to be tracked precisely. And as it is clearly shown, roll angle isn’t tracked that well, neither is angular rate.
This is mainly due to 2 reasons:
- Feed-forward gain isn’t high: this gain directly maps angular rate error to the control output (servo). And as evident from the angular rate graph, we aren’t getting that close to the setpoint, which should be boosted with additional feed-forward gain.
- Vibration: as obvious from the huge oscillations in the roll rate, there’s a constant 2.5Hz oscillation in the system. This makes it very tricky for the controller to track the setpoint, as there’s just too much noise
Altitude mode analysis
Then, altitude mode was tried out, which demonstrated autonomous control on both throttle and roll!
In altitude mode, we should have a constant altitude. However form the graph we can already identify 2 problems:
- Altitude is increasing (upper right graph), and the TECS altitude setpoint is also increasing, which isn’t desirable. This occurred because the
FW_THR_TRIMwas set to 0.6 (which is roughly the motor output shown in lower-left graph), whereas the vehicle needs more around 0.4 throttle (40%) for a constant altitude steady flight. - There’s an oscillation (period = 3.5 seconds) in pitch axis (lower-right graph), which results in oscillation in height rate (when paramotor goes nose-down, height rate decreases, vice versa).
So right after the flight, Silvan advised me to change the FW_THR_TRIM to 0.4, and that did the charm, as it will be explained below!
TODOs still left from this flight
- Increase the Feed forward gain for accurate roll tracking
Second: Loitering flight
Here are the parameter change from the first flight:
Most notable are modification in the FW_THR_TRIM, which will then help tracking the altitude setpoint better. But also sink/climb rates were adjusted to match actual vehicle capabilities better (as analysed from the first flight).
Also, the loiter radius was reduced from 80 meters to 20 meters. Which is possible as paramotor is very slow (~5.0 m/s), and can achieve tighter turn radius.
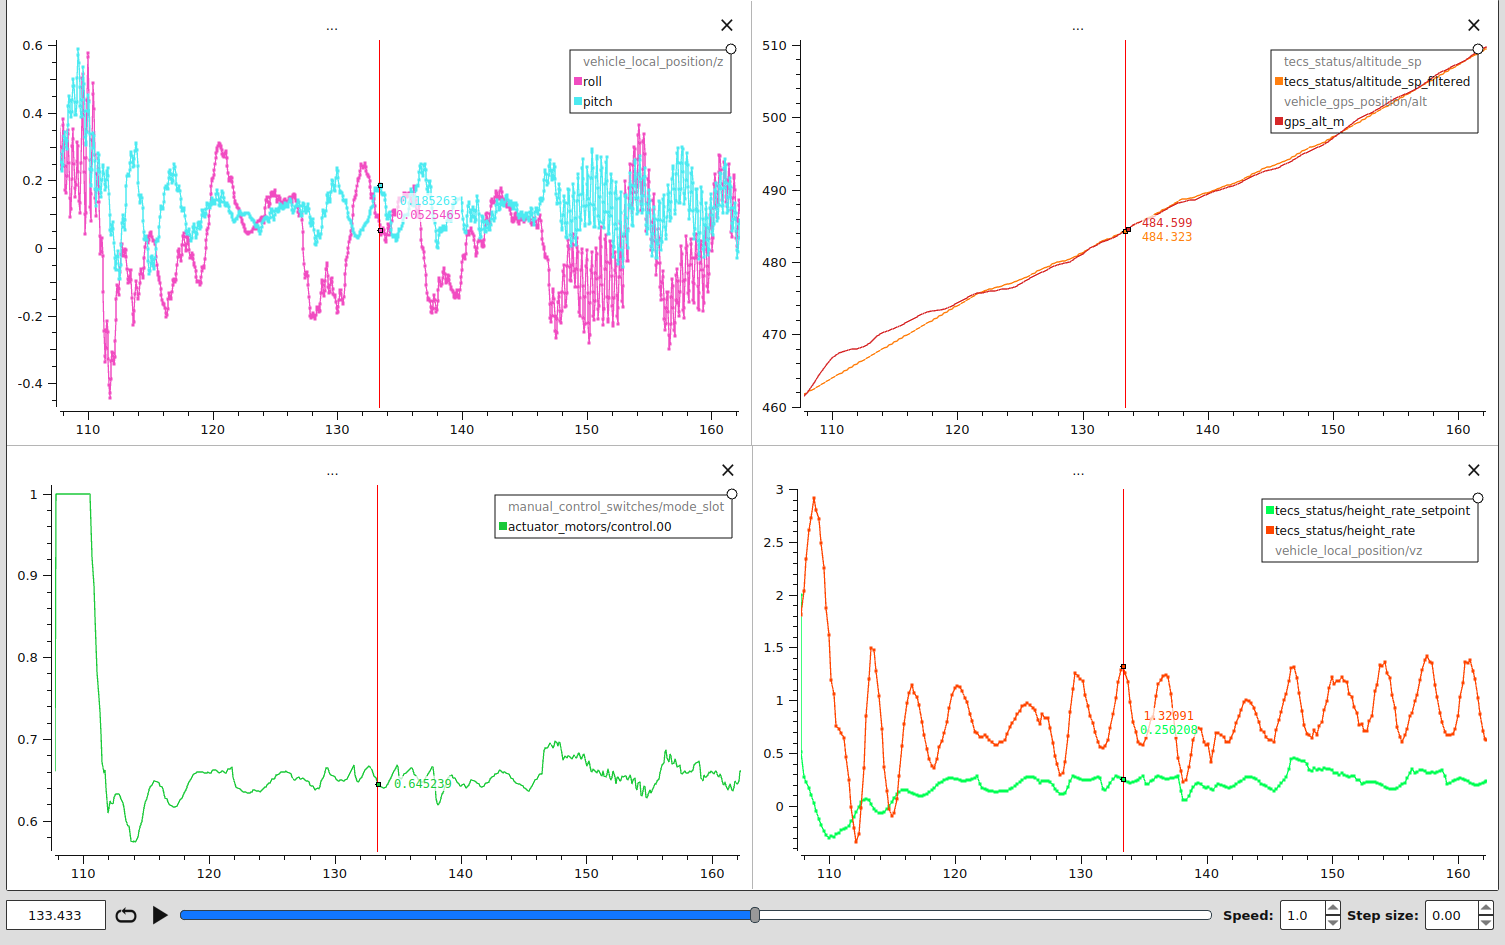
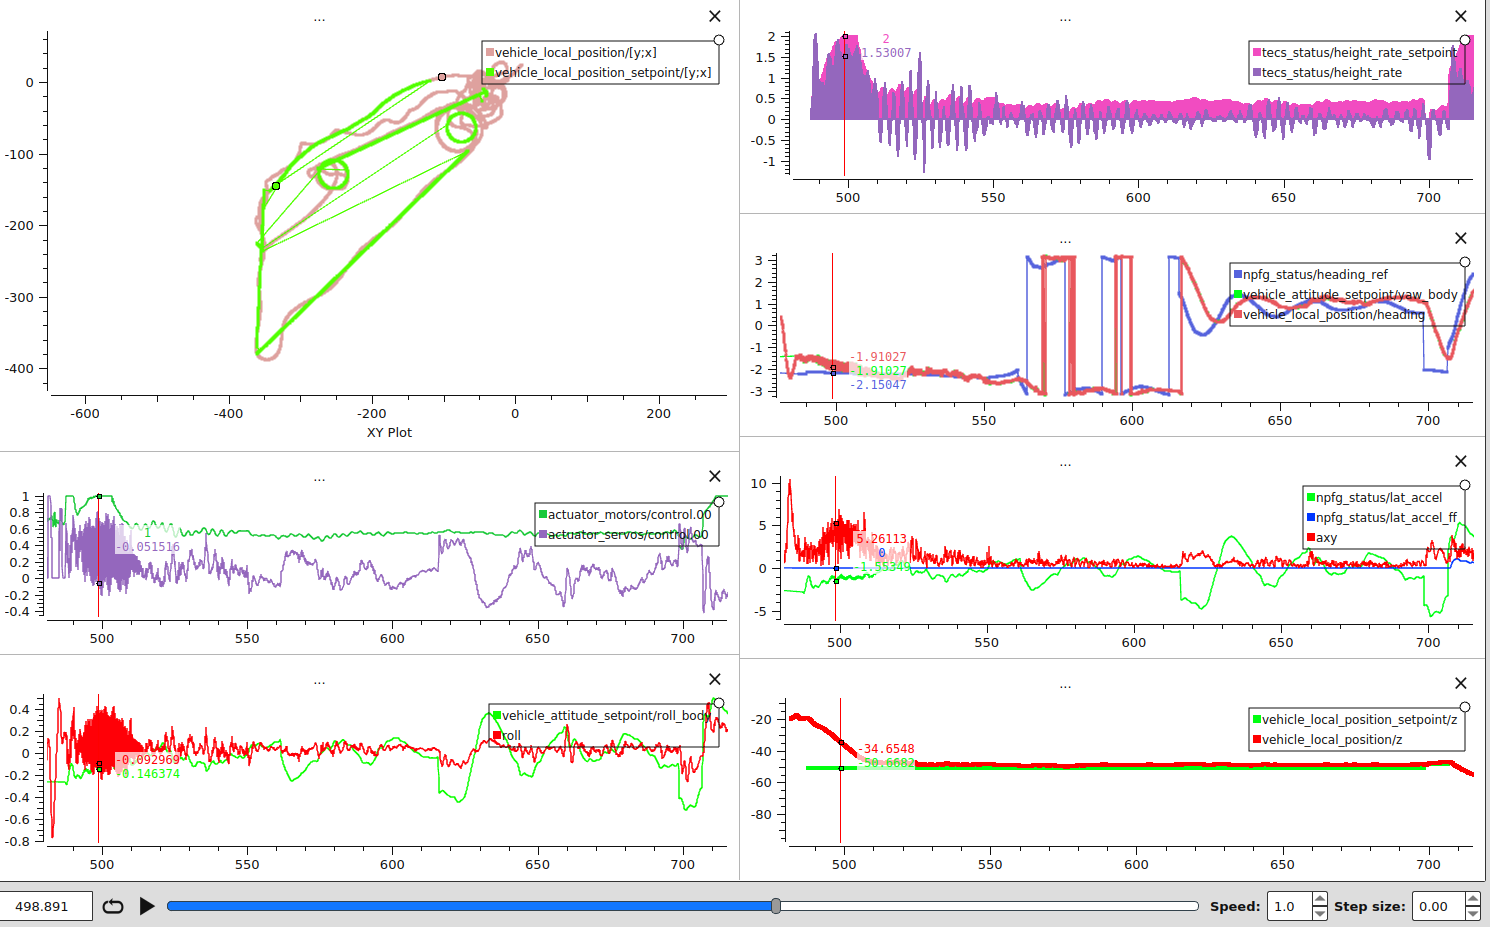
Loiter mode analysis
In Loiter mode, we want to achieve:
- Accurate tracking of constant altitude
- Accurate tracking of loiter circle (even in wind)
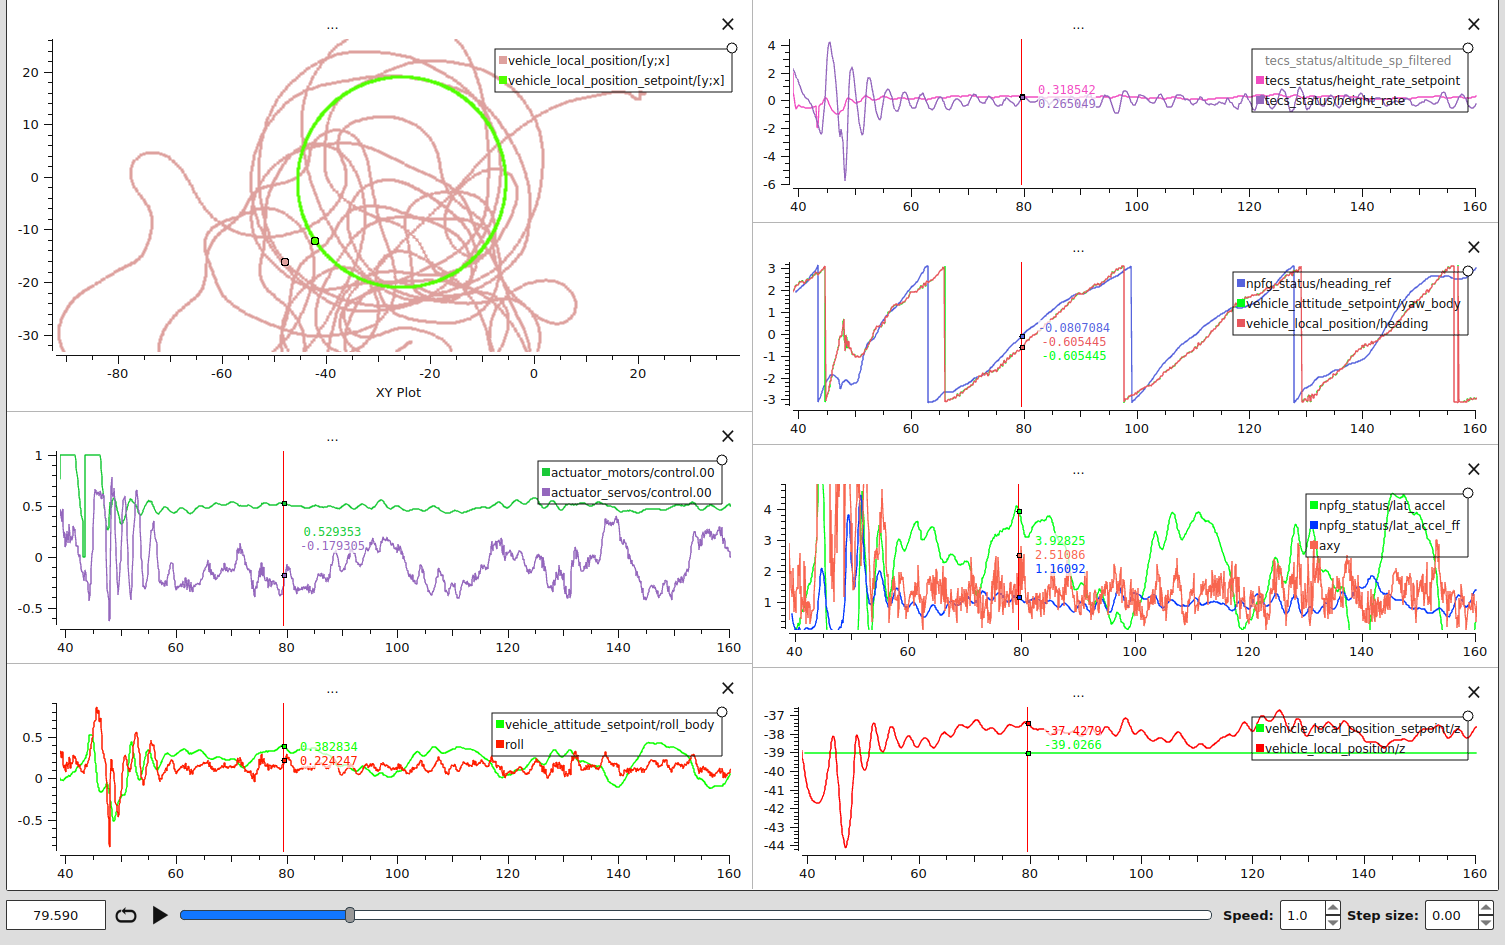
It is apparent from the log that circle isn’t getting accurately tracked. And is often on the outer side of the circle, with some delay in heading tracking (npfg_status/heading_ref vs vehicle_local_position/heading) in the curve on right pane.
This can be analyzed like so:
- The desired lateral acceleration from the path following algorithm is not getting tracked well at all (
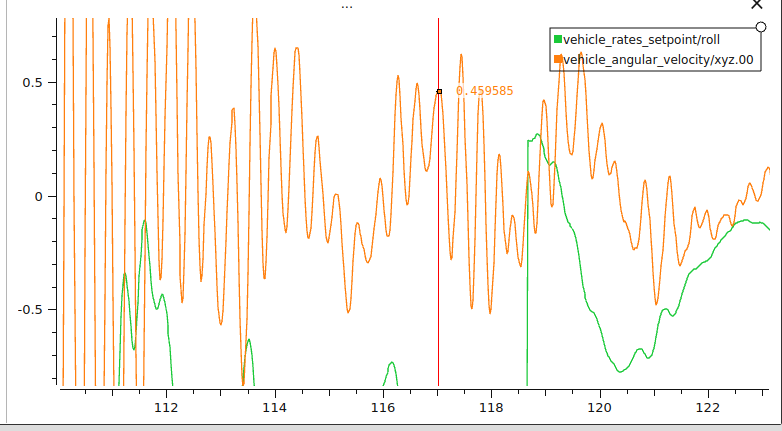
npfg_status/lat_accel*&axyin right pane). So vehicle would of course not track the circle. - Desired roll isn’t aggressive enough (e.g. when required lateral acceleration is at ~5.0 m/s^2 at 79.4 seconds mark, roll setpoint is just 0.4 rad = 24 degrees).
- Desired roll isn’t getting tracked accurately: as already shown from loiter mode flight, the roll tracking is limited due to low feed-forward gain, so that contributes further limitations.
However, the altitude is getting tracked quite well (with a bit of oscillations), within 2 meter error bound.
TODOs still left from this flight
- Figure out why the desired lateral acceleration from NPFG doesn’t really match up with desired roll angle
Third: Autonomous mission & RTL flight
Here’s the parameter change that occurred from the second flight:
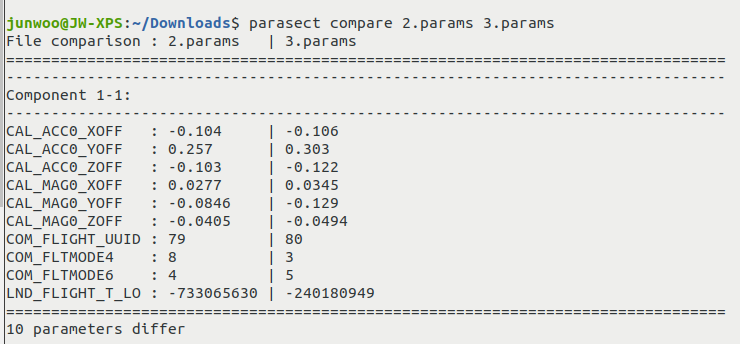
I just basically changed the wanted flight mode to Mission and RTL for the flight mode switch.
Mission mode analysis
I set up a Mission to go to the back of the park & come back in a rectangular pattern like this:
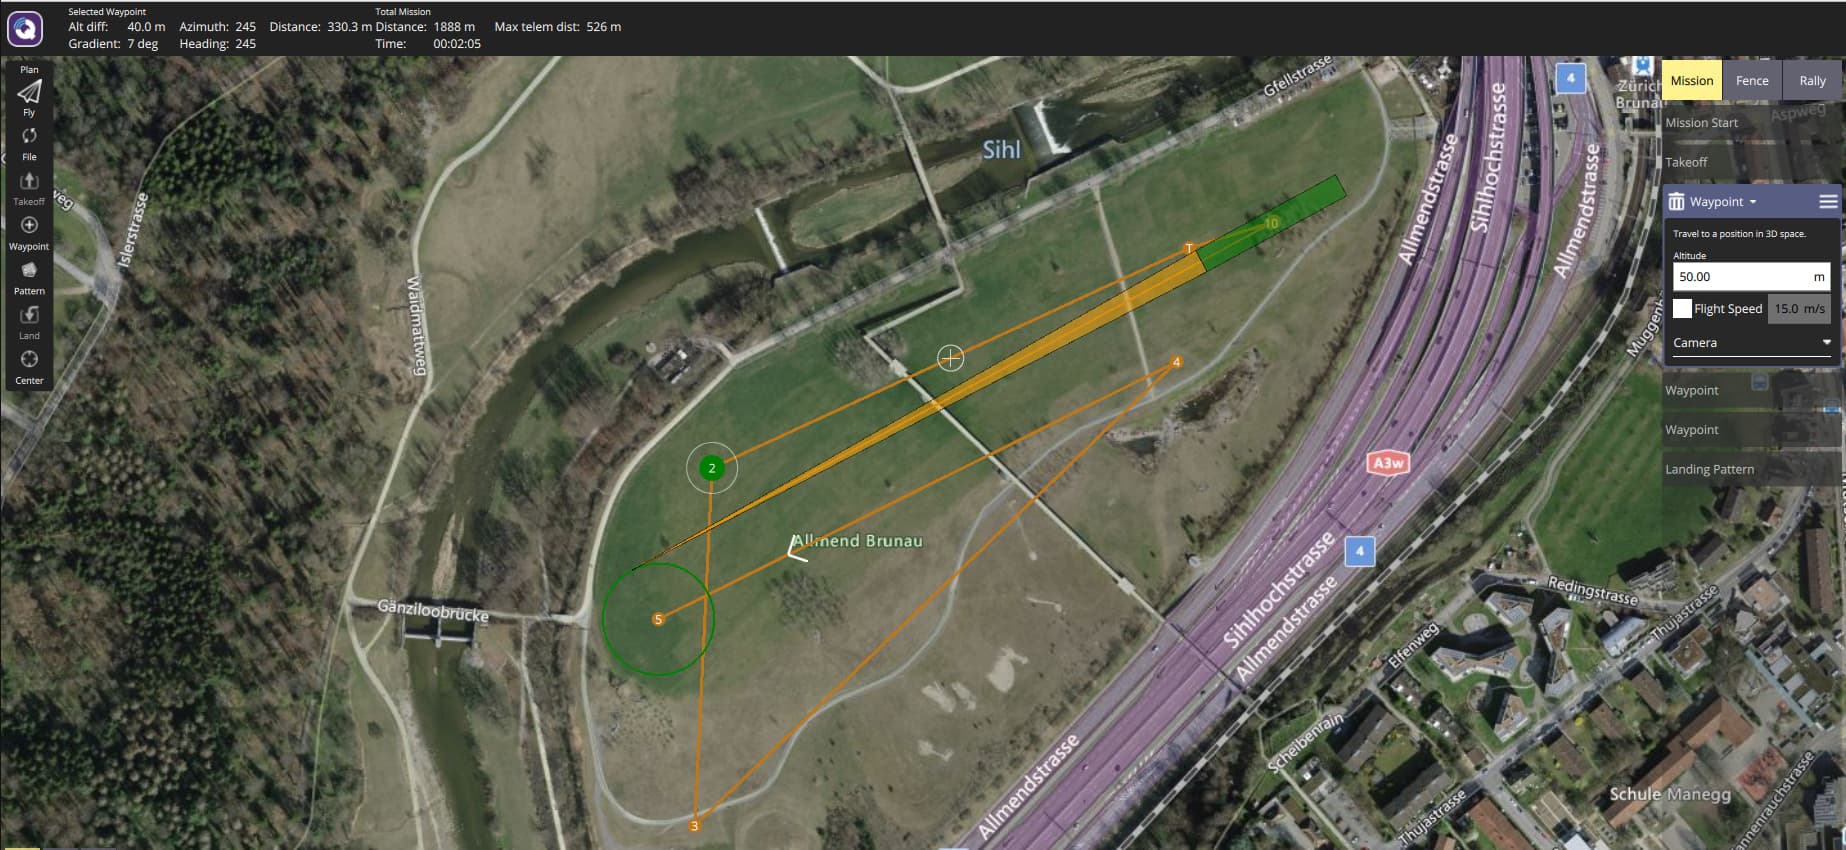
This was a mission with an altitude fixed at 50 meter, total waypoint distance of around 700 meters horizontally.
Mission mode has two objectives very similar to loiter mode:
- Track the path segments accurately (lines connecting waypoints)
- Track the altitude setpoint accurately
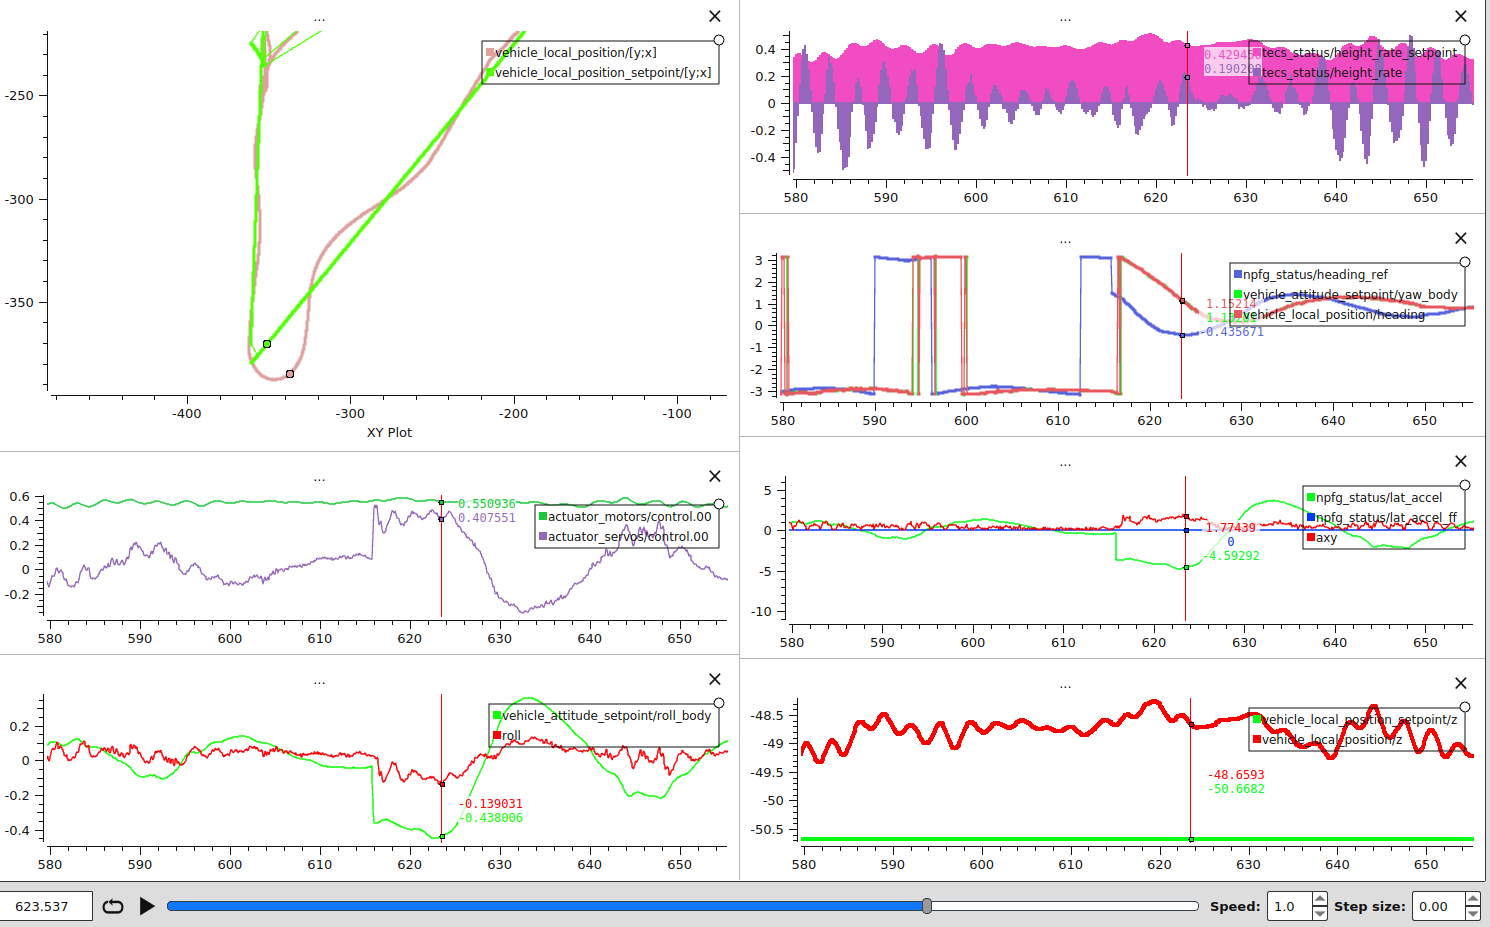
During the 220 seconds duration of Mission, paramotor successfully followed the waypoints, as shown above! Note that at the timestamp screenshot was taken, the vehicle position setpoint (in green) in upper left pane shows the first waypoint & vehicle in semi pink.
There were 2 observations:
- Vehicle is oscillating around the line path (623 seconds mark, screenshot below). This indicates that NPFG period is too small (aggressive), but probably more because vehicle can’t track the roll setpoint accurately (thus, the control is to blame, not the path following logic).
- As battery is draining out at the end of the mission, the TECS can’t keep up with the height adjustment demand (due to reduced thrust output), and vehicle loses altitude. This is more of a configuration problem on my side, as I didn’t setup RTL when there’s a battery low voltage warning.
RTL mode analysis
RTL was tried during the flight as well.
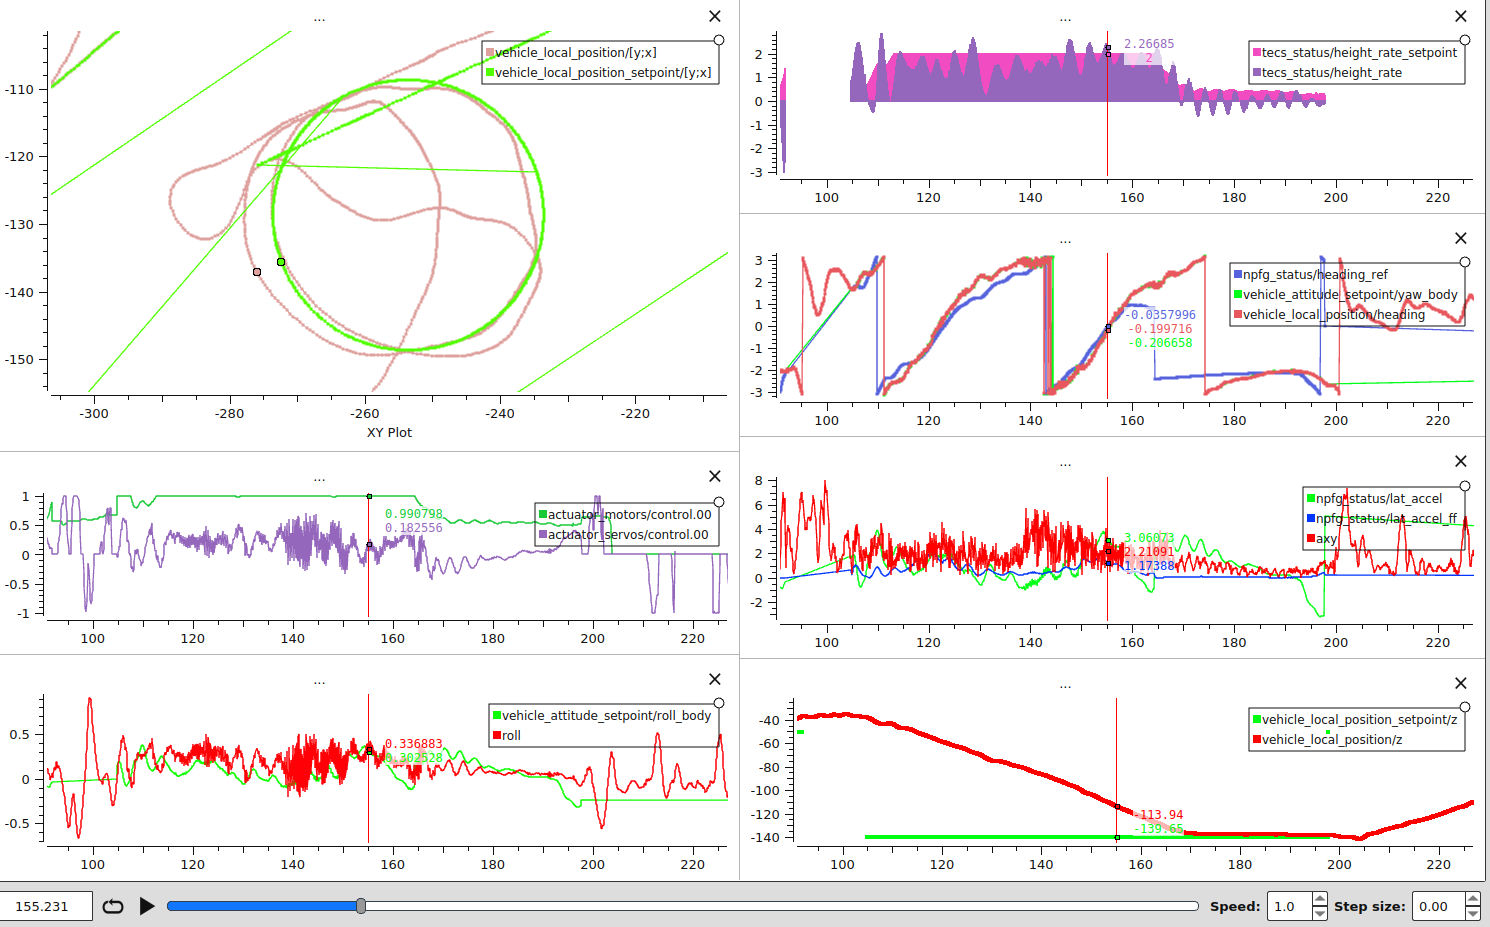
It can be shown that when I triggered the RTL (at 155 seconds mark), the vehicle ascended from 40 meters to 140 meters (RTL minimum altitude setting), which was definitely unnecessary for this test as the vehicle was very close to the launch site & it didn’t need to climb so much.
However it was impressive to watch it climb in a tight circle (it tracked the circle quite well as well, not sure how ![]() ) while ascending. But it wouldn’t have been able to complete the RTL I presume since it doesn’t have the distance sensor to the ground, which prevents auto-landing for fixed-wings (hinted by @tstastny).
) while ascending. But it wouldn’t have been able to complete the RTL I presume since it doesn’t have the distance sensor to the ground, which prevents auto-landing for fixed-wings (hinted by @tstastny).
Extra: Initial Mission mode tryout

Actually when I first activated Mission mode, while approaching the first waypoint there was a huge pitch oscillation (so I had to abort the mission and take over), which is shown in upper right curve above.
TODOs still left from this flight
- Figure out the NPFG period value that would make more sense (should be lower than 10)
- Reduce RTL altitude setting to avoid excessive climb before returning
- Increase climb speed limit to allow faster climb
- Figure out why TECS had pitch oscillation in the first mission tryout
- Figure out why as battery drains, the TECS can’t account for that and provide more throttle when altitude isn’t getting tracked well
- Figure out maybe a way to enable autonomous landing/RTL without distance sensor
Overall
Overall it was an awesome test flight and I was super happy to have made it somewhat autonomous with the Auterion team who gifted me this amazing toy! It was really surreal to watch the RC Paramotor loitering autonomously & doing missions. What a joy!
")
Also, removing GoPro improved the stability of the vehicle SO much that it was so chill / easy to fly (also there wasn’t a lot of wind). So it was fun to just fly it together with Auterion colleagues and have fun!
Special thanks to @Georacer for contributing an awesome parameter tool!
Future goals
Here are some future goals I would love to achieve:
- Autonomous takeoff
- Autonomous landing
- Thermalling
- Getting paramotor officially supported by PX4
Thanks for reading!