About
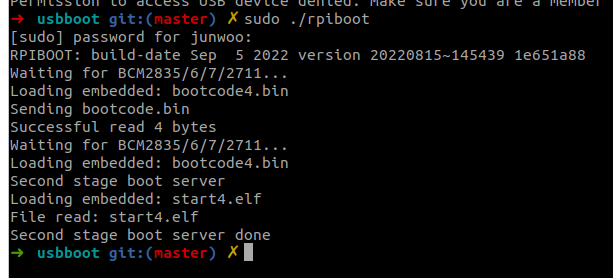
While setting up the Holybro’s new, to be released CM4 baseboard Pixhawk5X, I found that although I can flash the firmware, the HDMI output doesn’t show anything, and I neither can SSH into the Raspberry Pi via USB connection.
Therefore I am starting this thread to track any previous successes on getting this board running, so that we can also prepare for the documentation in parallel.
If anyone has succeeded in setting it up, please leave a comment!
What I’ve tried / done so far
This is the main tutorial that I’ve followed to get the RPi CM4 flahsed & working.
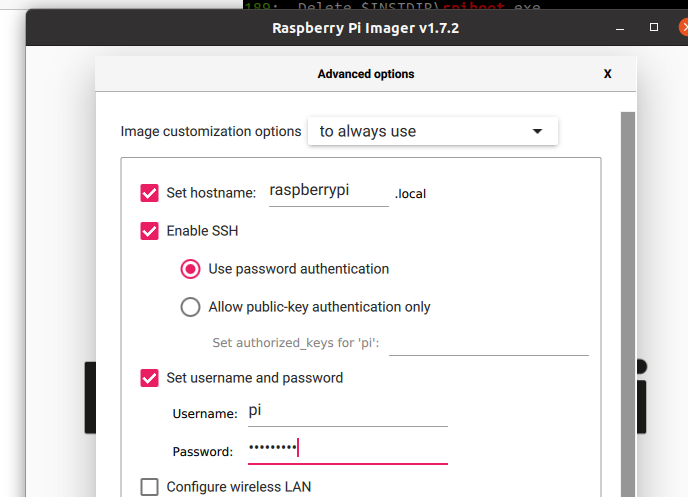
- Enabling SSH: How to Enable and Use SSH on Raspberry Pi 4 (Raspberry Pi OS/Raspbian) - The Robotics Back-End
- After reboot, the SSH file from
/bootjust disappears
- After reboot, the SSH file from
- Another SSH setup : Raspberry Pi headless setup via ethernet (and how to share the host PC's internet connection) • Najam R. Syed
- Couldn’t find
dhcpcd.conffile, it doesn’t seem to exist
- Couldn’t find
- Constant CM4 reboot issue on github: CM4 does not reboot · Issue #188 · raspberrypi/Raspberry-Pi-OS-64bit · GitHub
- Couldn’t verify as I couldn’t locate the boot log file from the eMMC booted partition
- Another setup : Full Raspberry Pi Compute Module 4 Setup / Imaging Guide
- ‘Update firmware’ part was a bit confusing, but tried the EEPROM Recovery option anyways, didn’t change the boot behavior
- Another setup : How to set up Raspberry Pi Compute Module 4 (CM4) - PC Guide
- Didn’t try, but it’s similar to all the other setup tutorials
Suspected Issue
Power supply (is USB-C enough?) → Apparently low voltage on SD card lines? can cause reboot (mentioned in the reboot Github issue I believe)?
Related Resources
- Gumstix Raspberry Pi CM4 + Pixhawk FMUv6 - #25 by Alis_Milton - Companion Computers - ArduPilot Discourse
- AP_HAL_Linux: RPI-CM4 detection by HefnySco · Pull Request #19530 · ArduPilot/ardupilot · GitHub
- https://www.gumstix.com/manufacturer/raspberry-pi/cm4-pixhawk-fmuv6.html
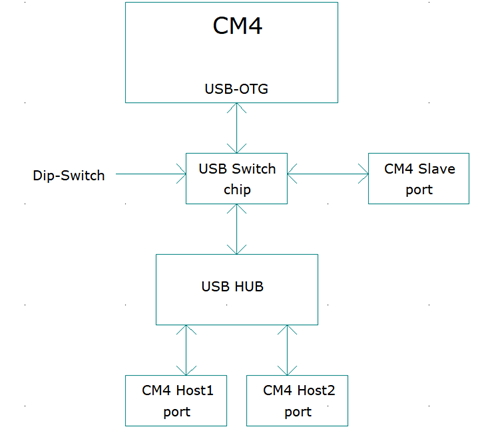
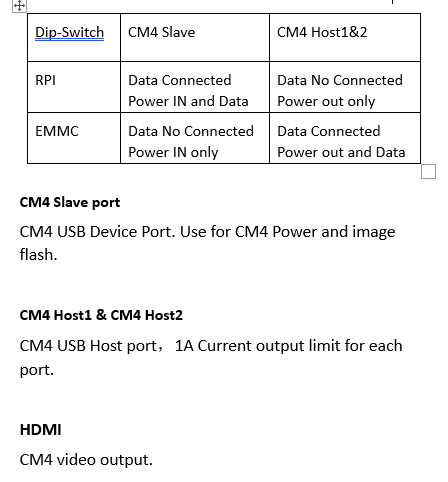
- Holybro CM4 documentation: Connections & Ports | Holybro
Other Comments
@ryanjAA it seems like you have the CM4 baseboard version yourself. Were you able to flash the Raspberry Pi successfully & have it communicating with PX4?