How to send mavlink message to my px4 drone

hello brothers, i’m px4 newbie and im on the project which making web drone control system.
thanks to the people here, i fixed my problem and now my gazebo and QGC is running properly.
and now i want to ask how to send my mavlink message to my drone.
when i get order from website(like changing waypoint route), i have to command my drone(more than 1) to do.
as far as i know, in realworld drone and QGC communicate using mavlink. so i want to write code that work like QGC’s command(takeoff, waypoint mission etc) using mavlink.

i know basic offboard control thanks to ROS 2 Offboard Control Example | PX4 Guide (main), but what i want is maybe different thing.

So the things I’m curious about are:

  1. can the drone be controlled just by sending a mavlink message like in the offboard example? If you don’t mind, I would appreciate it if you could provide a link to the example code for controlling px4 via mavlink.

  2. i study offboard control by px4_ros_com/src/examples/offboard_py/offboard_control.py at 86e9aeb20e55a4673fa8a9f1c29ea06a6c5ad1af · PX4/px4_ros_com · GitHub. and I don’t understand exactly what QOS is.

qos_profile = QoSProfile(
            reliability=ReliabilityPolicy.BEST_EFFORT,
            durability=DurabilityPolicy.TRANSIENT_LOCAL,
            history=HistoryPolicy.KEEP_LAST,
            depth=1
        )

Is there any problem if I just attach this qos_profile to all publishers and subscribers?

  1. In the offboard example above, i run PX4_SYS_AUTOSTART=4001 PX4_GZ_MODEL_POSE=“0,0” PX4_GZ_MODEL=x500 ./build/px4_sitl_default/bin/px4 -i 1 and that offboard node didn’t work, and i restart with -i 0, and all thing good.
    it is suspected that -i 0’s topic is start with /fmu/in/, and -i 1’s topic is start with /px4_1/fmu/in/.
    so how can i control specific instance?
    in Multi-Vehicle Simulation with ROS 2 | PX4 Guide (main), Is it possible to solve the problem by simply adding an instance number to the target_system of the message? (like -i 1 to target_system 2)

  2. Is there a way to create my drone at the desired coordinates and move it to the desired coordinates? I searched hard, but I could only find a manual way to change QGC’s home lat/lon. I want each drone to spawn at specific coordinates by using command like PX4_SYS_AUTOSTART=4001 PX4_GZ_MODEL_POSE=“0,0” PX4_GZ_MODEL=x500.
    I would also like to find a way to move the drone using coordinates. Maybe mavlink can solve this?

Thank you for reading my current problems. I hope my problems will help newbies in the future.

First of all, controlling a px4 drone via ROS 2 or mavlink are two different thing and they cannot be work both.
If you want to control via mavlink only, try disable uxrce-client on px4 and enable mavlink for the uart port.

QOS is for handling, distributing load balancing of messages (DDS) between ROS2 nodes and has nothing to do with px4. If you don’t know about QOS, simply leave as. If there is problem refer to this documents.
https://docs.ros.org/en/rolling/Concepts/Intermediate/About-Quality-of-Service-Settings.html
https://velog.io/@katinon/ROS2-ROS-2의-DDS와-QoS

Good luck

1 Like

I really do not understand why you want to use directly mavlink, since the micro agent will take care of all the communication between ROS2 nodes and the flight controller. You can write your ROS2 nodes either in python or C++, and leave the work to the agent and the flight controller.

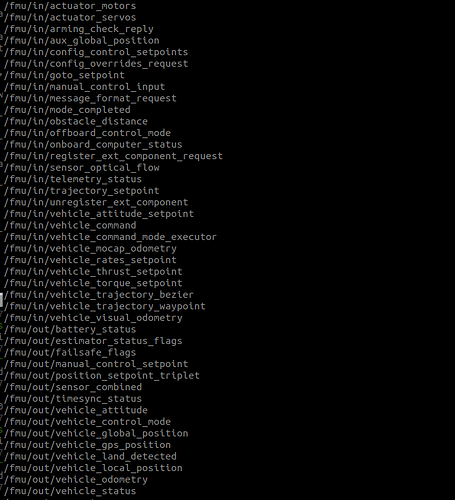
All the /fmu/in ROS2 topics can be used to command the flight controller in different ways. You can move your drone using coordinates, by publish on the dedicated ROS2 topic /fmu/in/trajectory_setpoint the coordinates you want to reach. With such topic you can send coordinates in the local NED of the drone and even velocities or accelerations. The flight controller then takes care of all to actually move your drone to the target position.

Anyways there are many different topics to control the drone:

You can see the list of /fmu/in/ topic (you can publish on them) and the list of /fmu/out/ (you can take values from them).

Just try and chose the way you like the most.

For what concerns QoS, as already suggested by @Kyuhyong_You , you can simply leave it as it is (the one in your post should work for all the PX4 topics). It has to do with the published messages.
For example history=HistoryPolicy.KEEP_LAST keep on topic only the last published message (every time some node publish on that topic, the topic content is overwritten), whereas history=HistoryPolicy.KEEP_ALL keeps messages queued in order of arrival, and pop them out of the list when they are read (if durability is set as VOLATILE). If you are deeply interested in how QoS work, you can search online or read at the suggested link.

For the multi vehicle simulation, looking at the guide i found Multi-Vehicle Simulation with Gazebo | PX4 Guide (main), which should be the appropriate solution for you. Also look at Gazebo Simulation | PX4 Guide (main), under Usage/Configuration Options. Look at how PX4_GZ_MODEL_POSE has to be defined to specify the vehicle spawn position.

I personally never try multi vehicle simulations, but seems that following the steps in the guide you will able to spawn multiple vehicles and for each of them a set of ROS2 topic are at disposal:

/parameter_events
/px4_1/fmu/in/obstacle_distance
/px4_1/fmu/in/offboard_control_mode
/px4_1/fmu/in/onboard_computer_status
/px4_1/fmu/in/sensor_optical_flow
/px4_1/fmu/in/telemetry_status
/px4_1/fmu/in/trajectory_setpoint
/px4_1/fmu/in/vehicle_attitude_setpoint
/px4_1/fmu/in/vehicle_command
/px4_1/fmu/in/vehicle_mocap_odometry
/px4_1/fmu/in/vehicle_rates_setpoint
/px4_1/fmu/in/vehicle_trajectory_bezier
/px4_1/fmu/in/vehicle_trajectory_waypoint
/px4_1/fmu/in/vehicle_visual_odometry
/px4_1/fmu/out/failsafe_flags
/px4_1/fmu/out/sensor_combined
/px4_1/fmu/out/timesync_status
/px4_1/fmu/out/vehicle_attitude
/px4_1/fmu/out/vehicle_control_mode
/px4_1/fmu/out/vehicle_global_position
/px4_1/fmu/out/vehicle_gps_position
/px4_1/fmu/out/vehicle_local_position
/px4_1/fmu/out/vehicle_odometry
/px4_1/fmu/out/vehicle_status
/px4_2/fmu/in/obstacle_distance
/px4_2/fmu/in/offboard_control_mode
/px4_2/fmu/in/onboard_computer_status
/px4_2/fmu/in/sensor_optical_flow
/px4_2/fmu/in/telemetry_status
/px4_2/fmu/in/trajectory_setpoint
/px4_2/fmu/in/vehicle_attitude_setpoint
/px4_2/fmu/in/vehicle_command
/px4_2/fmu/in/vehicle_mocap_odometry
/px4_2/fmu/in/vehicle_rates_setpoint
/px4_2/fmu/in/vehicle_trajectory_bezier
/px4_2/fmu/in/vehicle_trajectory_waypoint
/px4_2/fmu/in/vehicle_visual_odometry
/px4_2/fmu/out/failsafe_flags
/px4_2/fmu/out/sensor_combined
/px4_2/fmu/out/timesync_status
/px4_2/fmu/out/vehicle_attitude
/px4_2/fmu/out/vehicle_control_mode
/px4_2/fmu/out/vehicle_global_position
/px4_2/fmu/out/vehicle_gps_position
/px4_2/fmu/out/vehicle_local_position
/px4_2/fmu/out/vehicle_odometry
/px4_2/fmu/out/vehicle_status
/px4_3/fmu/in/obstacle_distance
/px4_3/fmu/in/offboard_control_mode
/px4_3/fmu/in/onboard_computer_status
/px4_3/fmu/in/sensor_optical_flow
/px4_3/fmu/in/telemetry_status
/px4_3/fmu/in/trajectory_setpoint
/px4_3/fmu/in/vehicle_attitude_setpoint
/px4_3/fmu/in/vehicle_command
/px4_3/fmu/in/vehicle_mocap_odometry
/px4_3/fmu/in/vehicle_rates_setpoint
/px4_3/fmu/in/vehicle_trajectory_bezier
/px4_3/fmu/in/vehicle_trajectory_waypoint
/px4_3/fmu/in/vehicle_visual_odometry
/px4_3/fmu/out/failsafe_flags
/px4_3/fmu/out/sensor_combined
/px4_3/fmu/out/timesync_status
/px4_3/fmu/out/vehicle_attitude
/px4_3/fmu/out/vehicle_control_mode
/px4_3/fmu/out/vehicle_global_position
/px4_3/fmu/out/vehicle_gps_position
/px4_3/fmu/out/vehicle_local_position
/px4_3/fmu/out/vehicle_odometry
/px4_3/fmu/out/vehicle_status
/rosout

notice that for each vehicle a number is assigned: /px4_1/fmu/..., /px4_2/fmu/..., /px4_3/fmu/...

Using the /px4_i/fmu/in/trajectory_setpoint topics, you should be able to publish trajectory setpoints, for each vehicle, thus controlling them using coordinates (in NED x,y,z obviously).

In the end each vehicle should be controllable separately with its specific ROS2 Node.

if you have further doubts, write

2 Likes

Hi, I think you should refer to the API of MAVSDK.
https://mavsdk.mavlink.io/main/en/

1 Like

hello friends, Thanks to you all, a lot of things have been resolved. However, there is one final problem that remains unresolved for me.

The problem is, I don’t know how to spawn the drone at the coordinates I want.

I referenced questions in Drone spawn position setup and How to change PX4 Gazebo (last version) home point when launching a simulation to solve the problem, but it didn’t work.
In the past I seemed to be able to get it to work fine via export PX4_HOME_LAT/LON, but now it doesn’t work. Could someone please give me some advice?
++ I change PX4-Autopilot/Tools/simulation/gz/worlds/default.sdf’s latitude/longitutde. By doing this, I was able to create it at the desired coordinates. However, what I’m doing is a multi-drone simulation, so I want to spawn multiple drones, each at the desired coordinates.

Hi,
In this part of my answer i suggest you the solution to this problem:

Try taking a look at the links. In there, you can see that each of the vehicle instances are launched individually in this way:

PX4_SYS_AUTOSTART=4001 PX4_GZ_MODEL_POSE="0,1" PX4_SIM_MODEL=gz_x500 ./build/px4_sitl_default/bin/px4 -i 2

specifing the parameter PX4_GZ_MODEL_POSE you can actually spawn each of your drones, in the wanted positions. As specified in Gazebo Simulation | PX4 Guide (main) such parameter can take up to 6 values:

PX4_GZ_MODEL_POSE="x,y,z,roll,pitch,yaw"

Thus is straightforward to specifiy each vehicle spawn pose.

If you want instead to spawn the vehicle at a precise longitude-latitude-altitude location, the solution is a little more tricky. Indeed you can only specify the LATITUDE, LONGITUDE and ALTITUDE of the gazebo world origin. Either you can speicify it with export as you suggested, or directly in SDF file of the world you use. Clearly this tell nothing about the spawn position of the drone. Infact you can only spcify the spawn position w.r.t. the gazebo world origin in NED frame.

If you are forced to use global LON/LAT coordinate to spawn your drone, what i suggest you, is to calculate the actual distance in x-y between the set origin (in lat/long) and the lat/long coordinates where you want to spawn your drone. To do that you can use the Haversine formula - Wikipedia or some similar.

You can obtain the x distance by usign the formula keeping an equal latitude for both the points, and y keeping an equal longitude. In this way you actually obtain the relative x-y coordinatse within your origin (i.e. point 1) and the wanted spawn position of the vehicle (i.e. point 2).

When you have these coordinates, just use them in PX4_GZ_MODEL_POSE and you have done.

1 Like

Thank you for your reply. I will try the method you suggested after downgrading the version and trying inserting the coordinates directly.

You could try, but as i already tell you, PX4_HOME_LAT, PX4_HOME_LON and PX4_HOME_ALT only set the home position of the simulation, and does not move your drone inside the gazebo world.
Let me explain beteer: You can only tell to gazebo that the simulated world origin is located at PX4_HOME_LAT, PX4_HOME_LON and PX4_HOME_ALT which is completelly different to specify the drone position. Indeed if you open QGC you will find that your drone is located exactly at the LAT, LON, ALT you’ve specified.

Moreover these 3 parameters are global parameters, thus you cannot assign different values for each drone (the export is indeed a way to set global variables).

1 Like

to be precise, the parameters set the takeoff location of the world, which is placed at a constant bias from the origin. In Gazebo-classic, for example, the takeoff location is specified in the file PX4-Autopilot/Tools/simulation/gazebo-classic /sitl_run.sh line 130:

....  --model-name=${model} -x 1.01 -y 0.98 -z 0.83  ....

the x,y,z specified identify the takeoff/spawn location w.r.t. the gazebo world origin. PX4_HOME_LAT, PX4_HOME_LON and PX4_HOME_ALT can specify only at which geographical coordinate, the point x= -1.01 , y= -0.98, z= -0.83 corresponds.

1 Like

You are right. Even with px4 running v1.14, it was not possible to generate coordinates for each drone. Now I’m trying to create a drone at the desired coordinates using the haversine formula and PX4_GZ_MODEL_POSE as you suggested. However, I am concerned that the error will increase if it is far from the origin coordinates.

there are multiple ways to calculate the distance between two geo coordinate. Haversine it’s the basic one. But there are recursive methods, as the Vincenty's formulae - Wikipedia that can increase the precision. What i suggest you is to use the coordinate with as many digits as possible.

Furthermore, you have to keep in mind that GPS localization has an intrinsic estimation error that is far more big then the one coming from haversine formula.

Give it a try, and remember to set your world LAT,LON origin. There should be Python packages dedicated to geodetic and distance methods. Take a look online to have a precise and reliable implementation.

1 Like

I’ve just found an old python implementation of mine, where i use geodesic distance. Take a look at the following code snippet:

import numpy as np
from geopy.distance import geodesic
x = geodesic((0,0), (p[0],0)).meters
y = geodesic((0,0), (0,p[1])).meters

where p is the difference between your assigned origin LONG,LAT and the drone location LONG, LAT, in WGS84. Thus:

p = [LONG_diff, LAT_diff]

in this way you obtain the x, y gazebo coordinates of the drone, w.r.t. the chosen origin.

Make sure that the difference p is positive for all the coordinate you calculate, by setting the origin as a point that is southern and western then all the drone positions. Otherwise you have to manipulate somehow the procedure to actually take care of negative values.

1 Like

Thank you so much for your efforts!!! I had no idea it would help me this much. In my heart, I want to pray in the direction you are facing every morning when I wake up. I’ll try using the haversine formula and geopy.distance as you suggested, and if the error is too large, I’ll try a different approach. Thank you again!!

1 Like