No.6:Outdoor Real Flight Experiments of Quadcopters Based on RflySim
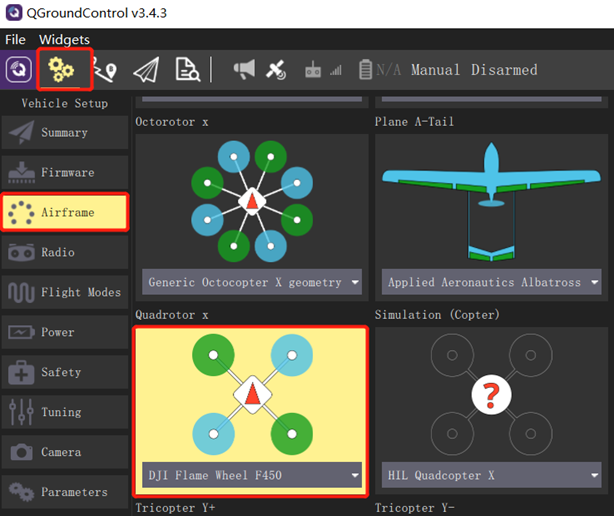
Aircraft Assembly: The actual flying aircraft we use is the FeiSi Laboratory X450 aircraft, as shown in the diagram below. Various calibrations and parameter adjustments have been carried out before the aircraft leaves the factory. During actual flight, it is necessary to modify the frame type of Pixhawk 6C from “HIL Quadcopter X” to “DJI Flame Wheel F450” in QGC (Ground Control Software), import the official aircraft parameter file, check the status of various aircraft sensors, and proceed with the test flight once everything is confirmed to be correct.

Considering the uncertainties in actual flight and the lack of complete failure protection logic in the self-generated control algorithm, safety issues should be thoroughly considered during real flight. Actual flight experiments should be conducted in relatively open areas, such as grasslands, while ensuring good weather conditions and low wind speeds. Under these conditions, first flash the firmware and parameters corresponding to the official FeiSi X450 aircraft version, conduct a test flight to confirm that the aircraft can take off normally. Afterward, flash the firmware generated by the controller model designed for this experiment, and use a remote controller to control the multi-rotor to verify the actual performance of the controller.
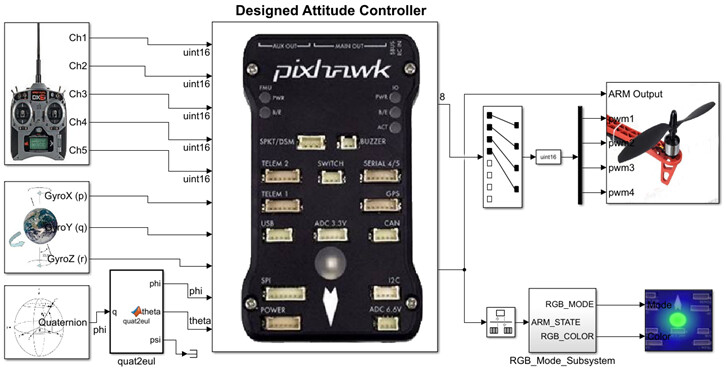
Adjusting the Simulink Controller: Open the Simulink file, as shown in the figure, change the output of uORB to the PWM_out output module provided by the PSP toolbox, regenerate the code, and download it to Pixhawk 6C. An example is provided in the file “0.ApiExps\3.DesignExps\Exp5_AttitudeSystemCodeGenRealFlight_old.slx” (or use the slx routine without the ‘old’ suffix). Note that in this example, unlocking via the throttle stick on the remote controller is not required during real flight, but toggling the CH5 switch is necessary for unlocking (sometimes it may need to be toggled twice).
Going through a pre-flight checklist will keep you and your drone safe. Here’s a checklist you can use before each flight:
WEATHER & SITE SAFETY CHECK
-
Chance of precipitation less than 10%
-
Wind speed under 15 knots (less than 20 mph)
-
Cloud base at least 500 feet
-
Visibility at least 3 statute miles (SM)
-
If flying at dawn / dusk, double-check civil twilight hours
-
Establish take-off, landing, and emergency hover zones
-
Potential for electromagnetic interference?
-
Look for towers, wires, buildings, trees, or other obstructions
-
Look for pedestrians and/or animals and set up safety perimeter if needed
-
Discuss flight mission with other crew members if present
VISUAL AIRCRAFT / SYSTEM INSPECTION -
Registration number is displayed properly and is legible
-
Look for abnormalities—aircraft frame, propellers, motors, undercarriage
-
Look for abnormalities—gimbal, camera, transmitter, payloads, etc.
-
Gimbal clamp and lens caps are removed
-
Clean lens with microfiber cloth
-
Attach propellers, battery/fuel source, and insert SD card / lens filters
POWERING UP -
Turn on the remote control and open up DJI Go 4 app
-
Turn on aircraft
-
Verify established connection between transmitter and aircraft
-
Position antennas on transmitter toward the sky
-
Verify display panel / FPV screen is functioning properly
-
Calibrate Inertial Measurement Unit (IMU) as needed
-
Calibrate compass before every flight
-
Verify battery / fuel levels on both transmitter and aircraft
-
Verify that the UAS has acquired GPS location from at least six satellites
TAKING OFF
- Take-off to eye-level altitude for about 10-15 seconds
- Look for any imbalances or irregularities
- Listen for abnormal sounds
- Pitch, roll, and yaw to test control response and sensitivity
- Check for electromagnetic interference or other software warnings
- Do one final check to secure safety of flight operations area
- Proceed with flight mission
GETTING YOUR DRONE OFF THE GROUND
Before we get started, let’s cover a few important safety protocols and recommendations. it is important to note that drones are not toys and can be dangerous. Let’s lay out some initial safety precautions to ensure a safe flight:
-
If you’re about to crash into something, turn the throttle down to zero, so you don’t potentially destroy your drone, injure somebody, or injure yourself.
-
Take out the battery of the drone before doing any work on it. If it turns on accidentally and the propellers start spinning, you might have a tough time doing future flights with missing fingers.
-
Keep your fingers away from the propellers when they’re moving.
-
If you’re a beginner learning to fly indoors, tie the drone down or surround it with a cage.
Choosing a safe and legal flight location is also crucial for a safe operation. Here are some tips on finding the perfect spot:
-
We suggest starting out in a large, open space, such as a park or a field. Many people prefer to learn on grassy ground, so if the drone needs to make a crash landing, it will at least have some sort of cushion.
-
Stay away from people or animals.
-
Avoid windy conditions as a beginner and be aware of your drone’s performance limitations (refer to user manual).
-
Lastly, choose a legal, safe, and visually interesting location to fly your drone. After a round of comprehensive research, our team compiled a list of where to fly a drone in various cities across the country.
Alright! Now that you understand the controls and you’ve taken all of the right safety precautions, you’re ready to fly.
-
To get your drone in the air, the only control you need is the throttle.
-
Push the throttle (left stick) up very slowly, just to get the propellers going. Then stop.
-
Repeat this multiple times and until you’re comfortable with the throttle’s sensitivity.
-
Slowly push the throttle further than before, until the copter lifts off the ground. Then pull the throttle back down to zero and let the drone land.
-
If you want to get good visualization, check out this great video from My First Drone。

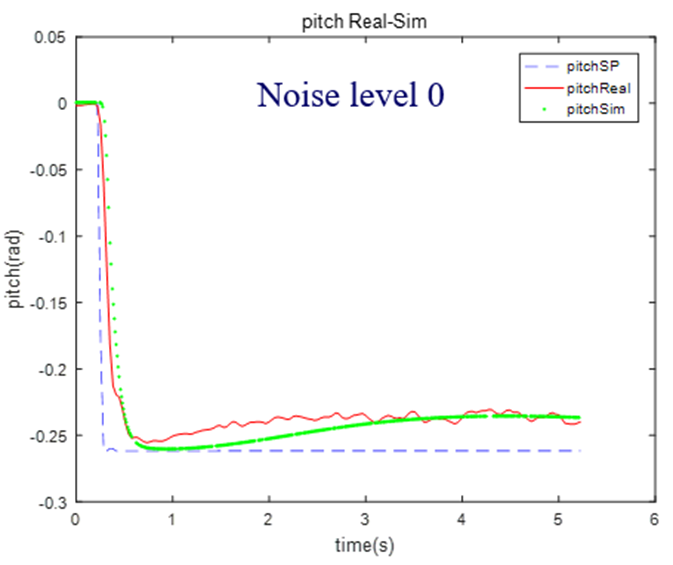
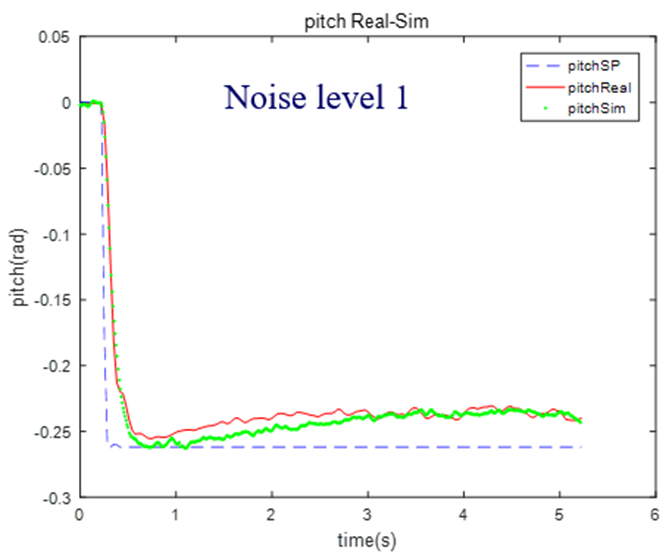
Read the log data from actual flight and semi-physical simulation. In the top right, with the noise level set to 1, it can be observed that the step response in both the dynamic process and noise level of the semi-physical simulation is relatively close to the step response in actual flight. In the bottom right, with the noise level set to 0, the angles calculated in the semi-physical simulation show no noise, and the dynamic process is close to the actual flight. Note that due to the fact that the frame type “HIL Quadcopter X” in the simulation mode is not exactly the same as the “DJI Flame Wheel F450” used in actual flight, and there are differences in controller parameters, it is normal for there to be some error in the response curves. Additionally, the aerodynamics of the multi-rotor in actual flight are very complex, while the model uses a simplified aerodynamic model, so some error in the final steady-state angle response curve is acceptable.
The principles mentioned above can be further explored in detail in the 11th chapter of ‘Quan Quan. Introduction to Multicopter Design and Control. Springer, Singapore, 2017’ or ‘Quan Quan. Du Guangxun, Zhao Zhiyao, Dai Xunhua, Ren Jinrui, Deng Heng (trans.). Design and Control of Multicopter Aircraft. Publishing House of Electronics Industry, 2018.’. For more detailed information, please visit https://doc.rflysim.com . The basic and advanced trial versions of RflySim can be obtained by providing your email address through the download link at https://rflysim.com/download . For the full-featured complete version, please inquire at service@rflysim.com .